

Have you ever played an RPG or text adventure game and thought that it would be cool to tell your own story? Now you can with this workshop! We will be creating a dialogue tree system with C#. It's pretty rad! B)
Getting started
Let's begin!
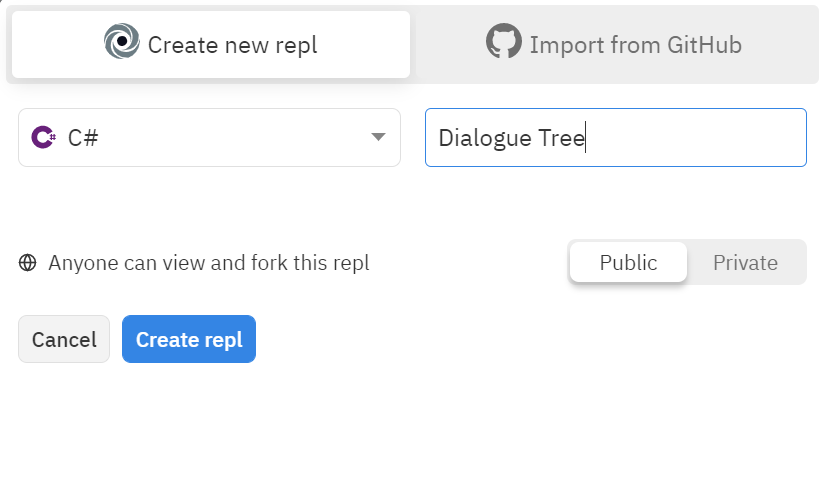
We're going to use Repl.it to create the project. It is an IDE which allows us to write our code online. No downloads necessary. Pretty convenient ey?
Create a new repl and use C# as the language by clicking here.
Once your repl spins up, you should see a file called main.cs with this code already added.
using System;

class MainClass {
  static void Main(string[] args)
  {
  }
}
Start by adding these two lines under the first line of the file:
using System;
using System.Collections.Generic;
using System.Text;
Without these two additional namespaces, a lot of what we're doing won't work.
Choice Class
Now, let's create a "Choice" class. Think of classes as blueprints, and by modifying the values in the blueprint, we can create objects. These objects will represent each of our choices, and we will link them together in order to create our dialogue tree.
Create the class under the main class, like so:
using System;
using System.Collections.Generic;
using System.Text;

class MainClass {
  static void Main(string[] args)
  {
  }
}

public class Choice
{
}

Now, let's start writing code inside the Choice class. Add the following code:
public class Choice
{
    public string answer;
    public List<Choice> choices;
    public List<string> connectionStrings;
}
- Each "Choice" object to have a "answer" string that will be displayed when they are gone to on the dialogue tree.
- Each "Choice" object will also have a list of other connecting choices and a list of strings that will be displayed when the respective choice is chosen.
- Don't worry if this seems confusing! It will make more sense later on.
Constructor
Next, add a constructor, like so:
public class Choice
{
    public string answer;
    public List<Choice> choices;
    public List<string> connectionStrings;

    public Choice(string answer)
    {
    }
}
Learn more about what a constructor is
This constructor takes in an "answer" string. It will be initialized to the "answer" string in a moment.
public class Choice
{
    public string answer;
    public List<Choice> choices;
    public List<string> connectionStrings;
    public Choice(string answer)
    {
        this.answer = answer;
        choices = new List<Choice>();
        connectionStrings = new List<string>();
    }
}
Initialize the answer to the constructor string, initialize choices as an empty list, and initialize connectionStrings as an empty list. The "this" part means that it will set the "answer" string outside of the constructor to the constructor's "answer."
That's all for this class!
Connect Function
Let's create a function that connects two choices and gives them a connection string. How else would we know what the options from one choice to another are?
class MainClass {
    static void Main(string[] args)
    {
    }

    public static bool Connect(Choice c1, Choice c2, string connection)
    {
    }
}
- Add this function inside the
MainClass. - This function takes in two Choices and a connecting string.
- If there is no connection between the choices, a connection is created by adding the second choice and connection string to the first choice's lists.
public static bool Connect(Choice c1, Choice c2, string connection)
{
    if (c1.choices.Contains(c2))
    {
        return false;
    }
}
If the choice contains the other choice, meaning they are connected, the function returns false because there is nothing to connect. If it does not contain it, we will have to connect them.
public static bool Connect(Choice c1, Choice c2, string connection)
{
    if (c1.choices.Contains(c2))
    {
        return false;
    }

    c1.choices.Add(c2);
    c1.connectionStrings.Add(connection);
    return true;
}
If there is no connection between the choices, a connection is created by adding the second choice and connection string to the first choice's list. We also want to add the connection string to the first choice's "connectionStrings" list. Then, return true.
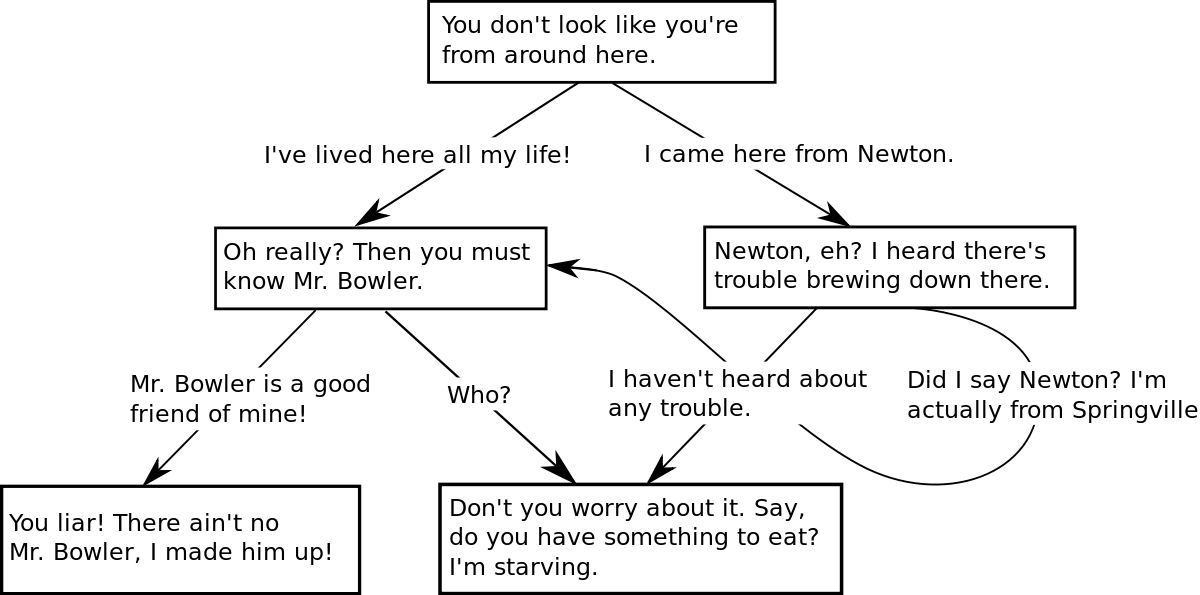
Creating the Connections
Let's fully create our dialogue tree in the main function before working further. This can be changed later, added to, and expanded upon, but let's set some blueprints down now.

static void Main(string[] args)
{
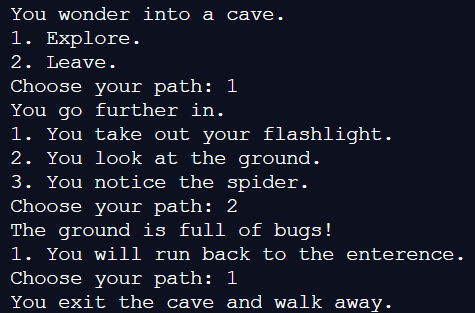
Choice choice1 = new Choice("You wonder into a cave.");
Choice choice2 = new Choice("You go further in.");
Choice choice3 = new Choice("You exit the cave and walk away.");
Connect(choice1, choice2, "Explore.");
Connect(choice1, choice3, "Leave.");
Choice choice4 = new Choice("There is ancient text written on the wall!");
Choice choice5 = new Choice("The ground is full of bugs!");
Choice choice6 = new Choice("The spider scares you!");
Connect(choice2, choice4, "You take out your flashlight.");
Connect(choice2, choice5, "You look at the ground.");
Connect(choice2, choice6, "You notice the spider.");
Connect(choice4, choice3, "You will find the enterence with your flashlight.");
Connect(choice5, choice3, "You will run back to the enterence.");
Connect(choice6, choice3, "You will stumble across the enterence.");
}
Copy this code into your main function. It creates choices and connects them together. Think of this as an example though. When you are done with writing all the code, feel free to get rid of it and create your own dialogue tree!
Let's break each part down:
Choice choice1 = new Choice("You wonder into a cave.");
Choice choice2 = new Choice("You go further in.");
Choice choice3 = new Choice("You exit the cave and walk away.");
First, we create these three choices. Every choice has the connection string that displays when the choice is picked.
Connect(choice1, choice2, "Explore.");
Connect(choice1, choice3, "Leave.");
The string in choice1 is displayed, and then the user is prompted with two choices: Explore or Leave. When a choice is picked, the connecting string is displayed. So, if the user picks Explore, the choice2 string of going further in is displayed. What we are doing here is creating choices and connecting them.
Choice choice4 = new Choice("There is ancient text written on the wall!");
Choice choice5 = new Choice("The ground is full of bugs!");
Choice choice6 = new Choice("The spider scares you!");
Then, we expand our dialogue tree with more choices.
Connect(choice2, choice4, "You take out your flashlight.");
Connect(choice2, choice5, "You look at the ground.");
Connect(choice2, choice6, "You notice the spider.");

Connect(choice4, choice3, "You will find the enterence with your flashlight.");
Connect(choice5, choice3, "You will run back to the enterence.");
Connect(choice6, choice3, "You will stumble across the enterence.");
Then, we connect the choices we just made just like what we've done before. Later on you will have a better understanding of how it works and can add more choices and connections to create your own dialogue tree.
Going Through the Dialogue Tree
We need to start at the top of the dialogue tree and go down it.
static void Main(string[] args)
{

  //The connections you just wrote would be here.

  Choice head = choice1;
}
Set a choice refrence called head and set it to choice1. This will be how we will track what choice we are on.
Choice head = choice1;
while (true)
{
}
Add this while loop. This is where we will be running through the dialogue tree until we reach the end.
while (true)
{
  Console.WriteLine($"{head.answer}");
  int count = 1;
}
Add these two statements inside the while loop. We are writing the choice's string and setting an integer called count to 1.
while (true)
{
  Console.WriteLine($"{head.answer}");
  int count = 1;
  if (head.choices.Count == 0)
  {
      break;
  }
}
If the current choice has no connections, meaning it is at the end of the dialogue tree, then break out of the while loop.
while (true)
{
  //Code we already wrote would be here.

  for (int i = 0; i < head.choices.Count; i++)
  {
      Console.WriteLine($"{count}. {head.connectionStrings[i]}");
      count++;
  }
}
Create a for loop that will go through the choice's connections and print them out for the user. Then, increase the count, which shows the numbers of the choices.
User Input

The user has to be able to choose what option they want! Without it, what's the point of the dialogue tree?
while (true)
{
 //Code we already wrote would be here

  while(true)
  {
    Console.Write("Choose your path: ");
  }
}
Create a new while loop. This is where the user input will be. Inside the while loop, write to the screen asking the user to choose their path.
while(true)
{
  Console.Write("Choose your path: ");

  try
  {
  }
  catch (Exception)
  {
  }
}
Inside the while loop you just created, add an empty try-catch statement. This will catch any errors that the user inputs such as invalid choices, which prevents our program from breaking.
try
{
    int input = int.Parse(Console.ReadLine());
    head = head.choices[input - 1];
    break;
}
catch (Exception)
{
    Console.WriteLine("That's not a valid choice.");
}
In the try block, we are taking in the user input and parsing it into a string. Then we are setting the head to the input-1. Instead of the user inputting a zero for the first choice, they are inputting a one, so we need to account for this.
In the catch block, we are letting the user know that they inputted an invalid choice.
Final Code
You are done! Now go and customize the tree with your own options and expand upon it!

Here is everything we wrote.
using System;
using System.Collections.Generic;
using System.Text;

class MainClass {
  static void Main(string[] args)
  {
    Choice choice1 = new Choice("You wonder into a cave.");
    Choice choice2 = new Choice("You go further in.");
    Choice choice3 = new Choice("You exit the cave and walk away.");

    Connect(choice1, choice2, "Explore.");
    Connect(choice1, choice3, "Leave.");

    Choice choice4 = new Choice("There is ancient text written on the wall!");
    Choice choice5 = new Choice("The ground is full of bugs!");
    Choice choice6 = new Choice("The spider scares you!");

    Connect(choice2, choice4, "You take out your flashlight.");
    Connect(choice2, choice5, "You look at the ground.");
    Connect(choice2, choice6, "You notice the spider.");


    Connect(choice4, choice3, "You will find the enterence with your flashlight.");
    Connect(choice5, choice3, "You will run back to the enterence.");
    Connect(choice6, choice3, "You will stumble across the enterence.");


    Choice head = choice1;

    while (true)
    {
      Console.WriteLine($"{head.answer}");
      int count = 1;
      if (head.choices.Count == 0)
      {
          break;
      }
      for (int i = 0; i < head.choices.Count; i++)
      {
          Console.WriteLine($"{count}. {head.connectionStrings[i]}");
          count++;
      }

      while(true)
      {
        Console.Write("Choose your path: ");

        try
        {
            int input = int.Parse(Console.ReadLine());
            head = head.choices[input - 1];
            break;
        }
        catch (Exception)
        {

            Console.WriteLine("That's not a valid choice.");
        }
      }

    }

  }

  public static bool Connect(Choice c1, Choice c2, string connection)
  {
      if (c1.choices.Contains(c2))
      {
          return false;
      }

      c1.choices.Add(c2);
      c1.connectionStrings.Add(connection);
      return true;
  }
}

public class Choice
{
    public string answer;
    public List<Choice> choices;
    public List<string> connectionStrings;
    public Choice(string answer)
    {
        this.answer = answer;
        choices = new List<Choice>();
        connectionStrings = new List<string>();
    }
}
Hacking
The fun doesn't stop here! Here are some ways you can expand on this proejct:
Happy hacking!