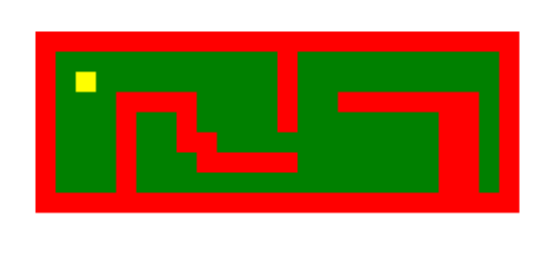
Dungeon crawlers are cool, so let's make our own. You can even make your own custom map! In this workshop, we will be creating a dungeon crawler overworld with Python and the turtle library.


Getting started
Let's begin!

We're going to use Repl.it, a free, online code editor, to create the project. Get started by going to repl.it/languages/python3.

Once your repl spins up, start by importing the turtle library at the top of the main.py file. If you haven't used it before, Turtle allows us to easily add graphics in Python.
import turtle
Once you've imported turtle, create these variables:
import turtle

myarr = []
col = 1
row = 1
turtle.hideturtle()
myarris an empty array that we'll use latercolandrowrepresent rows and columns. Here, we're just setting some initial player positions based on the map that you'll create later.- Finally, we're hiding the turtle cursor, which is visible by default.
Reading Text File

We're going to do something a little weird and write code that reads from a text file we haven't created yet. This may seem like a weird order of doing things, but I think the text file itself will make a little more sense if we worry about it later and write the code to deal with it now.
At the bottom of the main.py file, add these two lines, which is how you read from a file in Python:
f = open("map.txt", "r")

f.close()
In between these two lines, let's add some code to parse the text file. Start by adding the following:
f = open("map.txt", "r")

while(True):
  tempLine = f.readline()

f.close()
while(True)is Python's way of creating an infinite loop. Everything inside here will be repeated continuously until we break out of the loop.- In this case, we're also using it to read the file line by line. Each time the while loop is run, it goes to the next line.
- Inside the while loop, we create a variable called
tempLine, which reads each line of the file.
Next, add the following if statement:
while(True):
  tempLine = f.readline()

  if tempLine == "":
    break
This if statement is what will eventually break us out of the infinite loop. If the line being read is empty, it means we've reached the end of the file, so we beak out of the loop.
After that if statement, add:
while(True):
  tempLine = f.readline()

  if tempLine == "":
    break

  temparr = []
  for t in tempLine:
    temparr.append(t)
  myarr.append(temparr)
- This code only gets run if the line the program is currently reading is not empty
- First, we create an empty array called
temparr - Then, we loop through each character in the line and add it to the
temparrarray - Finally, we append the
temparrarray to themyarrarray. This creates a 2D array.
Drawing the Square Function

Squares! Squares everywhere! Let's draw them.
Outside of the while loop, create a function called drawSquare(), which takes in x and y coordinates, the size of the square, and the color:
#Previous code would be here.
def drawSquare(x, y, side, color):
Inside the function, make the turtle go up, and then make the turtle go to the passed-in location:
#Previous code would be here.
def drawSquare(x, y, side, color):
  turtle.up()
  turtle.goto(x, y)
Then, add the following if statement:
#Previous code would be here.
def drawSquare(x, y, side, color):
  turtle.up()
  turtle.goto(x, y)
  if (not color == "none"):
    turtle.color(color)
    turtle.begin_fill()
    turtle.end_fill()
- We only want to draw the square if there is a color. If the color is "none", then that space is empty, so we draw nothing.
- If there is a color, set the color to the passed-in color.
- Then, add
begin_fill()andend_fill()statements. Every time you draw something in turtle, it needs to be in between these two statements.
In between the begin_fill() and end_fill() statements, add a for loop that draws a square:
#Previous code would be here.
def drawSquare(x, y, side, color):
  turtle.up()
  turtle.goto(x, y)
  if (not color == "none"):
    turtle.color(color)
    turtle.begin_fill()
    for x in range(4):
      turtle.forward(side)
      turtle.right(90)
    turtle.end_fill()
Drawing the Map Function
Let's take that square function and apply it to the entire map. At the end of the main.py file, create a function called drawMap():
#This comes after everything we already wrote.
def drawMap():
Then, populate it with these initial variables:
#This comes after everything we already wrote.
def drawMap():
  x = -120
  y = 60
  originalX = -120
  side = 10
Here, we're just setting some initial locations, as well as the side length. We need the originalX variable because we need to know where to start when drawing every row.
After the variables, add the following code:
def drawMap():
  #Variables would be here.
  turtle.tracer(0, 0)
  for arr in myarr:
    for value in arr:
  turtle.update()
- The
tracer()andupdate()statements make the turtle draw everything at the same time rather than refreshing after every draw statement. Without them, the program would run really slowly. - In between these two statements, we're looping through our 2D array by adding two nested for loops—one which loops through each array in
myarr, and a second one which loops through each value of each array.
Inside the nested for loops, add:
def drawMap():
  #variables would be here.
  turtle.tracer(0, 0)
  for arr in myarr:
    for value in arr:
      if (value == "0"):
        drawSquare(x, y, side, "green")
      elif (value == "1"):
        drawSquare(x, y, side, "yellow")
      elif (value == "2"):
        drawSquare(x, y, side, "red")
      elif (value == "\n"):
        drawSquare(x, y, side, "none")
      else:
        drawSquare(x, y, side, "black")
      x+=side
    y-=side
    x = originalX
  turtle.update()
- For each square in the 2D array, we draw a square!
- Each square will have a value that we get from the text file that will represent color. These if statements set each value to a color, and draw the square with that color.
\nis an escape character that means "new line". If the value is\n, we don't want to draw anything since it's not something specifically inputted by the user in the file as something they want to draw. If the number is unknown, we default to drawing a black square.- After a square is drawn, we want to move on to the next square—that's what
x+=sidedoes. - After a row is drawn and the inner array completes, we want to go back to the original x coordinate and mode down one
yamount to start a new row.
Yay! The drawMap() function is done! Now, just under the function, call it:
def drawMap():
  #Everything we just wrote would be here.

drawMap()
This will show the user the original map before any movement.
Movement
Cool, now let's write some code for allowing the player to move!

up()
At the bottom of the main.py file, create a function called up(), and add the following code inside:
#The code we already wrote would be here.
def up():
  global myarr
  global row
  global col
In Python, by default you can't modify global variables (remember, these three variables are the ones we defined at the top of the file, making them "global" variables). So, in order to be able to modify these variables inside this function, we use the global keyword.
Next, add the following if statement:
def up():
  global myarr
  global row
  global col
  if (myarr[row-1][col] == "0"):
    myarr[row][col] = "0"
    row -=1
    myarr[row][col] = "1"
If the spot that we want to move up to is free, we move up there and make our current spot empty.
Finally, complete the up() function with the following code:
def up():
  global myarr
  global row
  global col
  if (myarr[row-1][col] == "0"):
    myarr[row][col] = "0"
    row -=1
    myarr[row][col] = "1"
  turtle.clear()
  drawMap()
We complete the function by clearing the screen and drawing the map again, since it is now updated.
down()
Under the up() function, create the down() function. The code in this function will look pretty similar to the up() function.
def down():
  global myarr
  global row
  global col
  if (myarr[row+1][col] == "0"):
    myarr[row][col] = "0"
    row +=1
    myarr[row][col] = "1"
  turtle.clear()
  drawMap()
The only difference is that instead of trying to move the player up, we're trying to move them down by increasing the row.
left()
Next, add the left() function. This again will look familiar:
def left():
  global myarr
  global row
  global col
  if (myarr[row][col-1] == "0"):
    myarr[row][col] = "0"
    col -=1
    myarr[row][col] = "1"
  turtle.clear()
  drawMap()
Can you spot the differences? And, do you understand why the parts that are different are different? If not, ask someone near you or ask your club leader.
right()
Finally, add the right() function:
def right():
  global myarr
  global row
  global col
  if (myarr[row][col+1] == "0"):
    myarr[row][col] = "0"
    col +=1
    myarr[row][col] = "1"
  turtle.clear()
  drawMap()
Listening for Player Input

Believe it or not, we're almost done! Now, let's write some code to allow our program to accept user input. At the bottom of the main.py file, add:
turtle.onkey(up, "w")
turtle.onkey(left, "a")
turtle.onkey(down, "s")
turtle.onkey(right, "d")

turtle.listen()
turtle.mainloop()
- First, we bind WASD to directions
turtle.listen()tells turtle to listen for user inputturtle.mainloop()tells the window to wait for the user to do something
The Text File

Alright, we're almost there! Finally, let's add the text file that we've been writing code for throughout this workshop.
In the sidebar on the left, create a new file. Call it map.txt. Inside, add:
222222222222222222222222
210000000000200000000002
200000000000200000000002
200022220000200222222202
200020020000200000002202
200020022000000000002202
200020002222200000002202
200020000000000000002202
222222222222222222222222
- 0 represents empty space
- 2 represents a wall
- 1 represents a player
Be sure to update the "col" and "row" values at the beginning of the program depending on where you place the player! For example, if you want to place the player of the example below 1 space to right, we would keep the row as 1, but we would set the column to 2. Remember that the index of an array starts at 0!
Once you create the text file, you've finished!
You're done!

Woohoo!!! You've reached the end of this workshop!
Final code:
import turtle


myarr = []
col = 2
row = 1
turtle.hideturtle()

f = open("map.txt", "r")

while(True):
  tempLine = f.readline()

  if tempLine == "":
    break

  temparr = []
  for t in tempLine:
    temparr.append(t)
  myarr.append(temparr)

f.close()

def drawSquare(x, y, side, color):
  turtle.up()
  turtle.goto(x, y)
  if (not color == "none"):
    turtle.color(color)
    turtle.begin_fill()
    for x in range(4):
      turtle.forward(side)
      turtle.right(90)
    turtle.end_fill()


def drawMap():
  x = -120
  y = 60
  originalX = -120
  side = 10
  turtle.tracer(0, 0)
  for arr in myarr:
    for value in arr:
      if (value == "0"):
        drawSquare(x, y, side, "green")
      elif (value == "1"):
        drawSquare(x, y, side, "yellow")
      elif (value == "2"):
        drawSquare(x, y, side, "red")
      elif (value == "\n"):
        drawSquare(x, y, side, "none")
      else:
        drawSquare(x, y, side, "black")
      x+=side
    y-=side
    x = originalX
  turtle.update()

drawMap()


def up():
  global myarr
  global row
  global col
  if (myarr[row-1][col] == "0"):
    myarr[row][col] = "0"
    row -=1
    myarr[row][col] = "1"
  turtle.clear()
  drawMap()


def down():
  global myarr
  global row
  global col
  if (myarr[row+1][col] == "0"):
    myarr[row][col] = "0"
    row +=1
    myarr[row][col] = "1"
  turtle.clear()
  drawMap()


def left():
  global myarr
  global row
  global col
  if (myarr[row][col-1] == "0"):
    myarr[row][col] = "0"
    col -=1
    myarr[row][col] = "1"
  turtle.clear()
  drawMap()


def right():
  global myarr
  global row
  global col
  if (myarr[row][col+1] == "0"):
    myarr[row][col] = "0"
    col +=1
    myarr[row][col] = "1"
  turtle.clear()
  drawMap()

turtle.onkey(up, "w")
turtle.onkey(left, "a")
turtle.onkey(right, "d")
turtle.onkey(down, "s")

turtle.listen()
turtle.mainloop()
Run the program by clicking the green "Run" button at the top of your repl. Play around with the output and see what it's like. Then, create your own map by modifying the values in the map.txt file!
Hacking
You're welcome to spend the rest of your club meeting making maps. Or, if you want keep coding and take this workshop even further, here are a few examples of ways you can do that:

