

Everyone likes unlimited storage, especially when it's available as a cdn (i.e. you can directly embed items uploaded into webpages). If you're on the Hack Club Slack, you've probably uploaded something or the other to #cdn
Today, we'll be creating a library that works with the Hack Club CDN. Along with that, we'll also create a command-line tool to upload files using our library. We'll be using Deno to accomplish this. (If you've previously used Node.js, check out this talk on Deno)
You should know a bit of Javascript to follow along -- but don't worry, if you don't know JS, you'll just take a bit longer and you'll have to Google somewhat.
Here's the final code
If you get stuck anywhere in this workshop, feel free to ask me questions! I'm @KhushrajRathod on the Hack Club Slack.
Note: This workshop does not use an online code editor, like most other workshops. This workshop will involve using a terminal and downloading a Code Editor + Deno, so school Chromebooks, iPads, and other devices that don't have command line access and program installation access cannot be used for this workshop.
Part 1: Theory
The Hack Club CDN API only accepts an array of URLs and not direct file uploads. This means we can mirror anything already hosted on a URL, but we can't upload files from our device. To get around this, we'll have to
- Start a file server on our device
- Expose the file server to the internet using ngrok
- Send the URL of the ngrok instance to the API
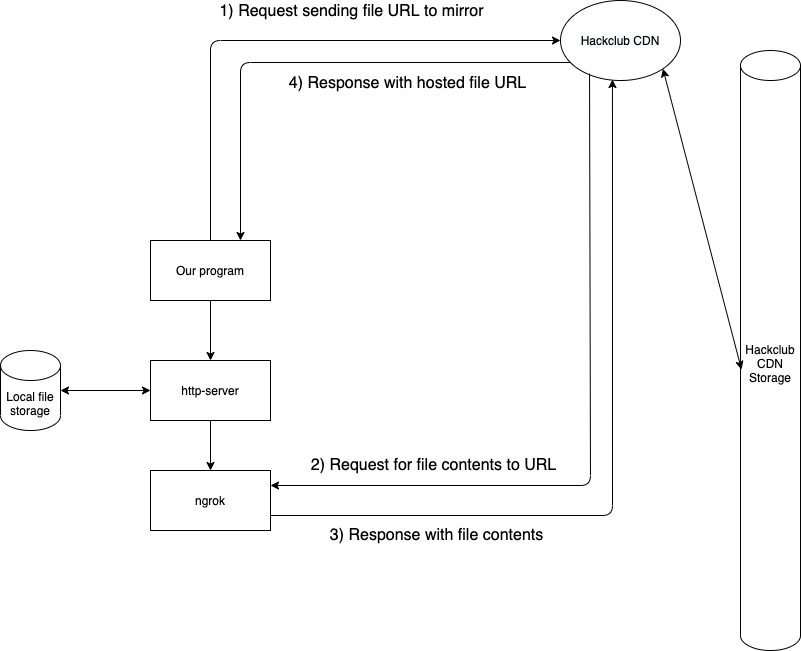
To make it possible to reuse our program in other programs, we'll be creating a Library (we'll call this mod.ts) and a CLI (we'll call this hcload.ts) for it.
Part 2: Preparing your environment
Part 2.1: Getting a code editor
Since we're going to be editing files locally, you'll need a code editor. I recommend Visual Studio Code, here's an article that introduces the basics: https://code.visualstudio.com/docs/introvideos/basics.
Part 2.2: Installing deno
If you've never heard about Deno before, it's a Secure JavaScript and TypeScript Runtime like Node.js. It let's you execute JavaScript code on your machine. It also has built in TypeScript support. TypeScript is a superset of JavaScript with useful features like types. Since Deno has built in TypeScript, we can simply create files with a .ts extension and run them without any additional transpilation steps.
In a nutshell:
- If you're on Windows, open PowerShell (Windows logo in taskbar > Search > PowerShell), and then run
iwr https://deno.land/x/install/install.ps1 -useb | iex
- If you're on macOS / Linux, open a Terminal (For macOS, CMD + Space and type "Terminal", for Linux, the command shortcut is usually Ctrl + Alt + T) and run
curl -fsSL https://deno.land/x/install/install.sh | sh
After you've done this (you may need to close and reopen your terminal / PowerShell), running deno --version should display something like:
deno 1.5.3
v8 8.7.220.3
typescript 4.0.5
Awesome! You have Deno setup successfully!
Part 2.3: Setting up your Code Editor
To get started, first create a Folder somewhere memorable on your computer, like your Desktop. Next, open that folder in your Code Editor and create two files in it
hcload.ts(our CLI)mod.ts(our library - This is where most of our code will be)
Inside hcload.ts, add
export default async function (): Promise<void> {
  console.log("Hello, world!")
}
Explanation: We're exporting a default function from our library that others will be able to use in their code.
Inside mods.ts, add
import hcload from "./mod.ts"
hcload()
Explanation: We're using the library we created in hcload.ts and calling its default function.
In your Terminal / Powershell, navigate to the folder in which you have your code. (See Navigating a terminal)
After you're in the folder you created your files in run ls to see a list of the names of files in your current directory. You should see hcload.ts and mod.ts as files present in your folder.
Run
deno install -A --unstable ./hcload.ts
This adds a symlink to your hcload.ts file that lets you simply run
hcload
instead of running
deno run -A --unstable ./hcload.ts
every time
Tip: To stop running your code, use CTRL + C
You just finished Part 2!!

Part 3: Programming the library
Part 3.1: Setting up the server
Open up mod.ts, and let's get started!
- First, let's create our HTTP server. We'll be using Oak, a server middleware framework for Deno.
import { Application, send } from 'https://deno.land/x/oak@v6.3.1/mod.ts'

export default async function (): Promise<void> {
  const app = new Application()
  app.use(async (context: any) => {
    context.response.body = "Server running"
  })

  app.addEventListener("listen", async ({ port }) => {
    console.log("HTTP server ready")
  })

  await app.listen({ port: 20685 })
}
At the moment, the server simply replies with "Server running" when anything is requested. If you trying running the program (simply run hcload and open localhost:20685 in your Browser), you should see HTTP server ready in your terminal, and "Server running" in your browser
- Next, let's ask for a filePath (a path to a file) in our library's default function, and serve the file when an HTTP request reaches our server
import { Application, send } from 'https://deno.land/x/oak@v6.3.1/mod.ts'

export default async function (filePath: string): Promise<void> { // <--- Changed
  const app = new Application()
  app.use(async (context: any) => {
    await send(context, filePath, { root: '/' }) // <--- Changed
  })

  app.addEventListener("listen", async ({ port }) => {
    console.log("HTTP server ready")
  })

  await app.listen({ port: 20685 })
}
Create a test file in the folder containing your code, or copy a small (< 1MB) file into that folder.
Modify hcload.ts to pass a filePath to the library.
import * as path from "https://deno.land/std@0.75.0/path/mod.ts"
import hcload from "./mod.ts"

hcload(path.resolve("./yourFile.txt"))
where yourFile.txt is the file you created / moved into your code directory. For e.x., if you created hello.txt, your code would be
import * as path from "https://deno.land/std@0.75.0/path/mod.ts"
import hcload from "./mod.ts"

hcload(path.resolve("./hello.txt"))
Run hcload and you should see the contents of the file in your browser preview. Congratulations on making it so far!
Part 3.2: Exposing localhost via ngrok
At the moment, files served will only be accessible over your home network. Since the Hack Club CDN needs to be able to make a request to your server over the internet, we'll need to expose the server over the internet.
- Import the "ngrok" module and expose the server to the web (in
mod.ts)
import { connect, disconnect } from 'https://deno.land/x/ngrok@2.2.3/mod.ts'
import { Application, send } from 'https://deno.land/x/oak@v6.3.1/mod.ts'
import * as path from "https://deno.land/std@0.75.0/path/mod.ts"

export default async function (filePath: string): Promise<void> {
  const fileBase = path.parse(filePath).base

  const app = new Application()
  app.use(async (context: any) => {
    await send(context, filePath, { root: '/' })
  })

  app.addEventListener("listen", async ({ port }) => {
    const ngrokUrl = `https://${await connect({ protocol: 'http', port })}/${fileBase}`
    console.log("NGROK: " + ngrokUrl)
  })

  await app.listen({ port: 20685 })
}
- fileBase is the last part of the path to the file, e.g. For "/home/runner/myFile.png", the fileBase is "myFile.png"
In your terminal, you should see a ngrok URL, visiting this URL should display the LICENSE contents.
Part 3.3: Making requests to the Hack Club CDN API with Ky
-
Ky is an HTTP client that lets you easily make requests to any server.
-
We'll be using a POST request, which sends data to a server -- In this case, we'll be sending the ngrok URL.
-
Now, the Hack Club CDN API only accepts an array of URLs, so we'll need to wrap our URL in an array
Add the following to mod.ts:
import { connect, disconnect } from 'https://deno.land/x/ngrok@2.2.3/mod.ts'
import { Application, send } from 'https://deno.land/x/oak@v6.3.1/mod.ts'
import ky from 'https://unpkg.com/ky/index.js'
import * as path from "https://deno.land/std@0.75.0/path/mod.ts"

export default async function (filePath: string): Promise<void> {
  const fileBase = path.parse(filePath).base

  const app = new Application()
  app.use(async (context: any) => {
    await send(context, filePath, { root: '/' })
  })

  app.addEventListener("listen", async ({ port }) => {
    const ngrokUrl = `https://${await connect({ protocol: 'http', port })}/${fileBase}`

    // @ts-ignore
    let response: string[] = await ky.post('https://cdn.hackclub.com/api/new', { json: [ngrokUrl] }).json() // <--- Wrapped in array [ ngrokUrl ]

    console.log(response[0])
    disconnect()
  })

  await app.listen({ port: 20685 })
}
Run hcload and you should get a URL like https://cloud-something.vercel.app/yourFile.ext. If opening the URL loads the file in your browser, or your browser asks you to download the file, CONGRATULATIONS! You've just hosted a file successfully on the CDN!
Now, instead of logging the response from our library, we want to return it to the calling function. We'll log it from the calling function instead.
- First, wrap return value of the function in a Promise.
return new Promise(async resolve => {
  const fileBase = path.parse(filePath).base

  const app = new Application()
  app.use(async (context: any) => {
    await send(context, filePath, { root: '/' })
  })

  app.addEventListener("listen", async ({ port }) => {
    const ngrokUrl = `https://${await connect({ protocol: 'http', port })}/${fileBase}`

    // @ts-ignore
    let response: string[] = await ky.post('https://cdn.hackclub.com/api/new', { json: [ngrokUrl] }).json()

    disconnect()
    return resolve(response[0]) // We're resolving the promise here instead of just returning
  })
  await app.listen({ port: 20685 })
}) as Promise<string>
- Next, change the Return type of the function to
Promise<string>fromPromise<void>
export default async function (filePath: string): Promise<string> {
  return new Promise(async resolve => {
    // ...
  }) as Promise<string>
}
Here's how `hcload.ts` should look now
import { connect, disconnect } from 'https://deno.land/x/ngrok@2.2.3/mod.ts'
import { Application, send } from 'https://deno.land/x/oak@v6.3.1/mod.ts'
import ky from 'https://unpkg.com/ky/index.js'
import * as path from "https://deno.land/std@0.75.0/path/mod.ts"

export default async function (filePath: string): Promise<string> { // <--- Changed
  return new Promise(async resolve => { // <--- Changed
    const fileBase = path.parse(filePath).base

    const app = new Application()
    app.use(async (context: any) => {
      await send(context, filePath, { root: '/' })
    })

    app.addEventListener("listen", async ({ port }) => {
      const ngrokUrl = `https://${await connect({ protocol: 'http', port })}/${fileBase}`

      // @ts-ignore
      let response: string[] = await ky.post('https://cdn.hackclub.com/api/new', { json: [ngrokUrl] }).json()

      disconnect()
      return resolve(response[0])
    })

    await app.listen({ port: 20685 })
  }) as Promise<string> // <--- Changed
}
In hcload.ts:
import * as path from "https://deno.land/std@0.75.0/path/mod.ts"
import hcload from "./mod.ts"

console.log(await hcload(path.resolve("./LICENSE")))
Deno.exit(0)
Note that we can now simply Deno.exit(0) after we get and log the URL -- we no longer have to exit the program manually using CTRL + C.
EXCELLENT! We've successfully made the library, and we've also used it in hcload.ts.

Part 4: Programming the CLI
Now that our library is ready, let's make hcload.ts use arguments from the CLI instead of hardcoding a file.
- First, let's import Yargs. Yargs makes it easy to parse command-line arguments.
import Yargs from "https://deno.land/x/yargs@v16.1.1-deno/deno.ts"
import * as path from "https://deno.land/std@0.75.0/path/mod.ts"
import hcload from "./mod.ts"

console.log(await hcload(path.resolve("./LICENSE")))
Deno.exit(0)
Next, let's parse the args using Yargs (just after all the import statements in hcload.ts)
const args = Yargs(Deno.args)
  .usage("Usage: hcload -f file")
  .option("file", {
    alias: "f",
    description: "Path to file to upload",
    demandOption: true,
  })
  .example('hcload -f myPic.png', 'Upload a file')
  .argv

console.log(args)
Run hcload -f test and you should probably see something like
{ _: [], f: "test", file: "test", "$0": "deno run" }
We want to pass the full path of the property "file" to our library's default function
import Yargs from "https://deno.land/x/yargs@v16.1.1-deno/deno.ts"
import * as path from "https://deno.land/std@0.75.0/path/mod.ts"
import hcload from "./mod.ts"

const args = Yargs(Deno.args)
  .usage("Usage: hcload -f file")
  .option("file", {
    alias: "f",
    description: "Path to file to upload",
    demandOption: true,
  })
  .example('hcload -f myPic.png', 'Upload a file')
  .argv

console.log("Working...")

const fullPath = path.resolve(args.file)
const url: string = await hcload(fullPath)

console.log(url)

Deno.exit(0)
Try running
hcload -f abc.ext
where abc.ext is a file in your current directory. For e.x., if the output of ls was
myMovie.mp4
mySong.mp3
myDocument.pdf
and you wanted to upload the document, you would type
hcload -f myDocument.pdf
The program should return a Hack Club CDN Url
CONGRATULATIONS! You've successfully managed to build a Deno Library and a CLI for it!

Hacking!
Using your library / CLI in other projects
Whenever you want to quickly upload a small file to a CDN, you know what to use!
- If your project is a Deno project, you can simply import the
mod.tsinto your project like we did fromhcload.ts. If you want to, you can publish your library to https://deno.land/x/ to use it easily in other projects.
import hcload from "./mod.ts"
- If your project is not a Deno project, you can use the CLI as a library too -- just make sure you pass the --quiet switch to Deno and remove the
console.log()s when installing/running hcload.
deno install -f -A --unstable --quiet hcload.ts
then, run hcload and parse stdout.
Extending your library
By design, the Hack club CDN accepts an array of URLs. This means we can:
-
Add support for multiple URLs and files - Check this out on GitHub or deno.land/x
Host a website on the Hack Club CDN
By getting a bit creative, we can host websites on the Hack club CDN (Note: this is by far not the best way to do this, but it is fun :) )
- Here's the website made from the personal website workshop hosted using the Hack Club CDN. Can you figure out how it's done? Hint: Right-click > Inspect element to view the website code.
Did you make something awesome? Share it on #ship in the Hack Club Slack and tag me with @KhushrajRathod!