
Snake is addicting. We've all played the game on those tiny flip phones and as programmers, wondered the internal logic of them. But it turns out that creating one is a super easy thing to do! This workshop exists to teach you how to create your own customizable snake game that works smooth and looks good! Are you excited???
What you'll build
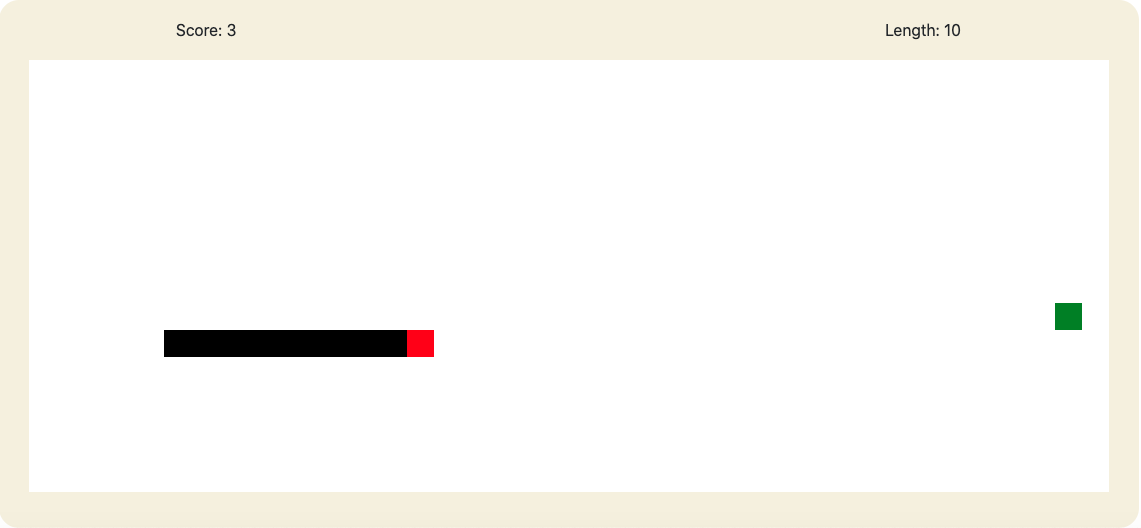
Here's a demo on what you'll be building. Also, the final code and the final demo:
Know this beforehand
Although technically, there aren't any prerequisites, this workshop will be a whole lot more fun if you have a basic understanding of HTML, CSS, and JavaScript. But don't worry if you don't, because we all learn by doing! We'll also be using Bootstrap which as a CSS styling framework.
What this workshop will cover, and what it won't
Workshops get really boring when they're absurdly long, so we'll be focusing on just JavaScript for most of it. However, we'll go over the starter template for clarification.
And finally... your IDE
An IDE (Integrated Development Environment) is just fancy speak for where your code will run. We'll be using repl.it as our IDE because...
1. It saves your code in the cloud
2. All you need is an internet connection and a web browser
3. It's really easy to fork from
Lets begin, shall we?
Step 0: Stealing Forking the starter template
Yeah, I lied. Before we begin coding, we need to fork (copy) the starter template. Here's how ... 1. Navigate to the Starter Template 2. Edit anything and the template will be copied as one of your repls 3. Click on the run button to run the website, and click on the "open in a new tab" button on the right of the url inside the repl's output.
You can make a change now, like changing the pages title in the <title> tag or adding a random space. Another option is to wait until we start coding JavaScript!
Step 1: Slaughter all confusion
We need to eliminate any confusion that stems from the starter template. To do that, I'll go over the individual files one by one.
The HTML file
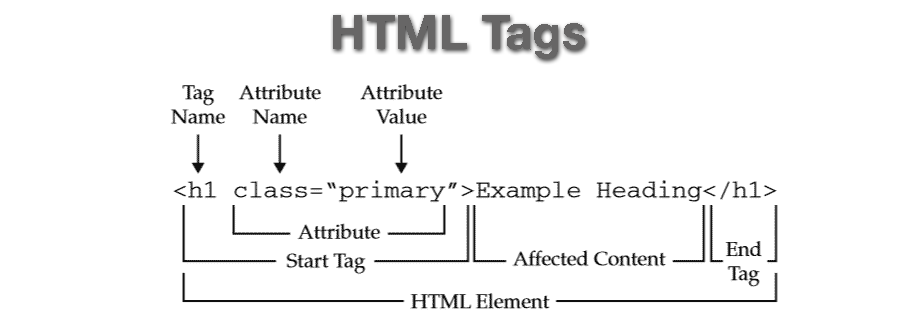
HTML stands for Hyper Text Markup Language and is used for defining the basic structure and content of a web page. HTML consists of opening tags followed by closing tags. Inside the two tags, we add in our content. We use HTML to define a <div> (container) for our snake game and <span>/<svg> elements for the play button and stats. Now lets go over it!
html <!DOCTYPE html>tells the browser to render the file as an HTML document- Inside
<html lang="en">is where all of our content goes - Inside the
<head>tag is where content that is more geared towards accessiblity, metadata, and the title. It is not visible on the page, except for the title. - Finally, the
<body>houses the visible part of our program and everthing that is rendered on page load. We add JavaScript after definining our HTML elements to avoid errors orginiating from accidently accessing an HTML element before it has been loaded, and to make our pages load vital components first.
This is the basic overview of an HTML document. Now lets dive into our <head> tag!
First up is the <title> tag. This tag simply takes text helps web browsers display it above the search bar. I've called in JS Snake, but you can call it whatever. These <meta> tags:
<meta charset="utf-8" />
<meta name="viewport" content="width=device-width, initial-scale=1" />
are additions to any web page that should always be included. The first line tells the browser that the character encoding of characters used inside the webpage is utf-8. This means that we can use the extensive set of characters this encoding provides and is important for the browser to know.
The second line is used for proper viewport configuration on mobile devices. The name tag tells us that we are referring to the viewport. content="width=device-width tells the browser to set the page width to the on-screen width of the device, and initial-scale=1 means to set the initial zoom level to 1.
<link rel="stylesheet" href="https://cdn.jsdelivr.net/npm/bootstrap@4.5.3/dist/css/bootstrap.min.css" integrity="sha384-TX8t27EcRE3e/ihU7zmQxVncDAy5uIKz4rEkgIXeMed4M0jlfIDPvg6uqKI2xXr2"
     crossorigin="anonymous" />
<!-- Link to our styles.css stylesheet -->
<link rel="stylesheet" href="style.css" />
These two <link> tags define CSS stylesheets that are being linked to our page. The rel attribute is an HTML attribute meaning it adds more functionality to HTML elements. In this case, it defines the purpose of the link attribute which is to link a CSS "stylesheet". Furthermore, the href attribute defines the url of the stylesheet. The first tag refers to a CSS framework we'll use called bootstrap. It links to their stylesheet and allows us to use their styles. Our stylesheet is local on the filesystem, so we can give it a link of "style.css".
We can look into the <body> tag now. Starting off with our snake's container, we define a <div> element. A <div> element is simply a box that contains other elements. It's used to group elements, and also as literal boxes. id and class are two new HTML attributes. id means that the element has a unique identifier used for referencing the element in CSS and JavaScript. class is the same thing, but it allows multiple elements to fall under the same identifier.
However, there's another great property of class in our case. Remember that Bootstrap stylesheet we used? That stylesheet contains custom styles that are refereneced under class names. Using those class names in our HTML will allow the stylesheet to select our element and the styles will be applied. Therefore, a second class we use is container. This class means that the container will resize based on the width of our page.
To contain the score and length we use another <div> element. Since this <div> element is inside the old one, the contents won't overflow our previous one. It has different classes to become a flex container so that spacing and alignment is easier. Inside this we have two <span> elements that define inline-text.
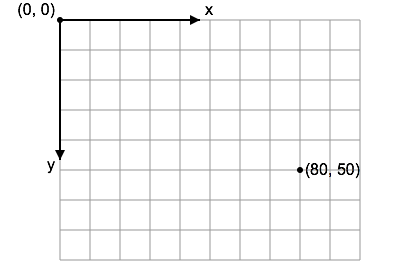
Finally, we add an HTML <canvas> element. I want to give special attention to this because it'll be important to the understanding of our snake game. Html canvas is a type of bitmap graphics implementation in which shapes and lines can be drawn easily with JavaScript. It has a coordinate system that corrolates with each pixel making it easy to place graphics accurately. It also had width and height attributes that define the maximum coordinates of the x and y axis. These attributes automatically influence the height and width of the element on the page. You can see an example here:
The last elements are the <script> tags with a src attribute defining the url. The first three are Bootstrap's required scripts and the last one refers to ours.
The CSS file
CSS stands for Cascading Style Sheets and defines how the HTML elements look to the user. CSS syntax looks like this:
element-to-modify, class/id-name {
  property: property value
}
You can select an element to apply styles to, or select a class/id name. This is why we added so many ids and classes to our elements!
Take a look at "style.css". We add a beige variable to :root to define a single color. To modify our snake container, we access the class and change properties. We modify the background-color, the border-radius, and some padding. Padding is the space between the border of the element and the content of it. Margin means the space around the border of an element. We override Bootstrap padding, change the button colors and spacing, and apply a visibility: hidden property on our score and length. We do this to hide it until we show it using JavaScript (because JavaScript can access HTML and CSS properties!).
And finally, the JavaScript file
The limitations of CSS and HTML is that they are one-time rendered, can't do computations, and don't have variables. JavaScript solves this by being able do just about anything. It can even modify HTML and CSS properties and elements! According to es6 standards, a 'use strict' line should be included at the top of our page. JavaScript variables are declared using the let keyword. These variables are accessible inside the current block. A block is defined by brackets, but more on that later. The variables after 'use strict' define the HTML elements by using
let snakeContainer = document.getElementById('id');
document refers to the page object available by default in JavaScript. This object has a method, or function, that is called using dot notation. To use dot notation we simply refer to the object, document, and add a . followed by the method name, getElementById(). This method is followed by a semicolon to indicate the end of a line. Inside the method we need to pass a parameter so that it can assign the appropriate variable to snakeContainer. We pass in the id of the element, "snake-container" and it successfully references the correct element. Now that we have these variables, we can modify them using dot notation!
For example, refer to this code:
snakeCanvas.width = snakeContainer.offsetWidth - 60;
snakeCanvas.height = snakeCanvas.width / 2.5;
We use dot notation to change the HTML attributes, width and height. We set the width to the container's width-60 (because of padding) and the height to the canvas's width/2.5 (that's our ratio of width to height, 5:2). offsetWidth is a method of any HTML object. Since snakeContainer is an HTML object, we can reference its width.
Step 2:
Now lets start making the functionality of our snake game! Refer to the flowchart:
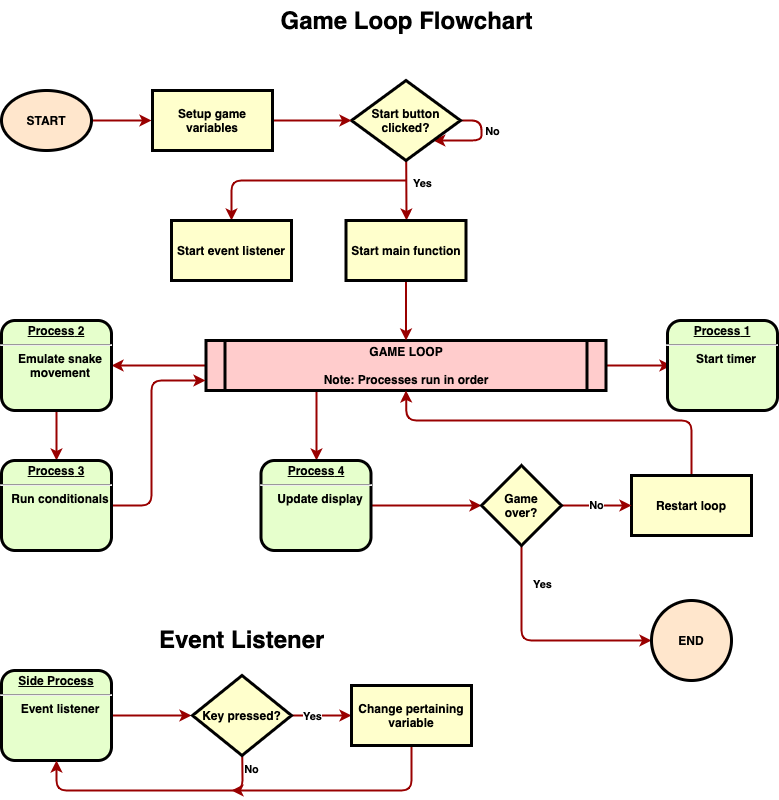
Let me explain the processes more thoroughly:
- First we make the game variables. These can include a snake object, a gameOver variable, etc.
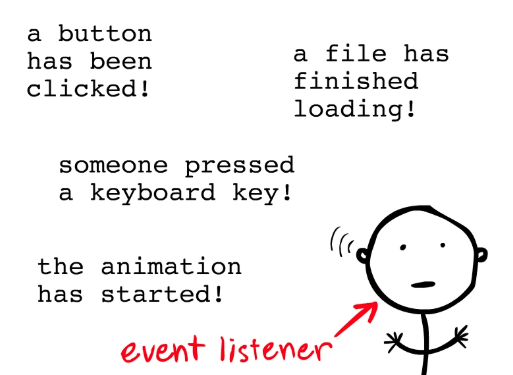
- We add an event listener on the
documentsearching for a keypress. When it's pressed, our snake can move. This event listener is documented at the bottom of the flowchart. - Now we get to our game loop. This loop controls the snake's movement and is run during the game. These processes go in order:
- JavaScript repeats our game loop every
intervalseconds - Then, we move the snake in the direction the user has selected. The direction is stored in amoveDirectionvariable which is controlled by the event listener. It is emulated because the display doesn't change, only the internal coordinates do. - We run our conditionals which are just functions that run based on the snake's position. These arecheckBounds(),checkPassThrough(), andcheckFood()- Finally, we update our display if the game is not over. If it's over we simply stop the main loop. This repeats over and over until our snake dies. This is the general gist of the program, so lets break it up. Development will consist of multiple milestones to help keep track of progress and check for accuracy.
Milestone 1
For milestone 1 we will initialize variables used during the game loop, and also for proper rendering of our canvas. We will then create a render() function that draws our snake. The file used for the rest of this workshop is "script.js".
To start off, add this code at the very end:
const blocksX = 40;
const blocksY = 16;
const pixelsPerBlock = snakeCanvas.height / blocksY;
let centerX = (Math.ceil(blocksX / 2) - 1) * pixelsPerBlock;
let centerY = (Math.ceil(blocksY / 2) - 1) * pixelsPerBlock;
This looks big! Lets tackle it step by step. const is another way to declare variables in JavaScript and it's used when the variable's value shouldn't be changed. If a const was changed, JavaScript would throw an error making it easy to avoid accidental changes. First we declare the number of blocks running accross the canvas and up and down. These have to be in a 5:2 ratio to keep every block square.
We calculate pixelsPerBlock by dividing the height by blocksY. pixelsPerBlock defines the width and height of the blocks. We calculate the center by divided the number of blocks by 2 to get half. Since our canvas rendering starts at coordinate 0, coordinate 0 is actually block 1. Therefore, we have to subtract one block and then multiply it by the pixels per block to get an accurate placement of our block. This placement is at the top left corner of the block. After we subtract one and multiply it by pixelsPerBlock we get the coordinate of the center.
Now, add
const interval = 80;
at the end. This just defines how much time in miliseconds to wait before repeating the game loop.
const eventKeysToDirection = {
    w: 'up',
    a: 'left',
    s: 'down',
    d: 'right',
    ArrowRight: 'right',
    ArrowLeft: 'left',
    ArrowDown: 'down',
    ArrowUp: 'up',
};

const oppositeDirections = {
    right: 'left',
    left: 'right',
    up: 'down',
    down: 'up',
};
This block of code defines two constant variables. Go ahead and add it to the end. Remember we talked a bit about objects? Well, the accurate definition of an object is that it is a variable that can store multiple "keys" paired with "values". The keys are simply ways to access values and we can do so by referring the object, and then the key in dot notation.
So to get the value 'up' from eventKeysToDirection we can simply do eventKeysToDirection.w because w is the key under which 'up' is stored. Please don't confuse this with a key on the keyboard! A key can be any word or group of letters. The first object pairs event listener keycodes to directions and the other one simply states opposite directions for any given direction. These will both be used for our event listener.
Now we start to add in variables that affect our game state. Add in
let score = 0;
let length = 1;
to the end of your code. These are pretty self-explanatory and we'll get back to them later.
Here's a very interesting variable!
let snakeCoords = {
    H: { x: centerX, y: centerY },
    B: [],
    F: {},
};
Let me explain. All of our snake will reside in snakeCoords. snakeCoords is an object that includes keys of H, B, and F. These stand for head, body, and food respectively. Inside these are objects with x and y keys representing the coordinates. Inside H is a single object that we set to centerX and centerY. At first, we only need a head because our snake hasn't eaten yet.
The key B includes an array. An array in JavaScript can include a collection of variables, objects, and values. We use it to include many different {x: number, y: number} objects which each represent a block of the body. B and F are empty for now.
For food generation, add this block at the end:
do {
    snakeCoords.F = {
        x: Math.floor(Math.random() * blocksX) * pixelsPerBlock,
        y: Math.floor(Math.random() * blocksY) * pixelsPerBlock,
    };
} while (snakeCoords.F.x === centerX && snakeCoords.F.y === centerY);
A do while loop in JavaScript initially runs the do block, and runs it over and over again until the while is evaluated false. We use the built-in Math.random() library to generate a random number from 0-1. We multiply it by our block count to get a number from 0-blocksX. blocksX isn't included, so we don't have to subtract 1.
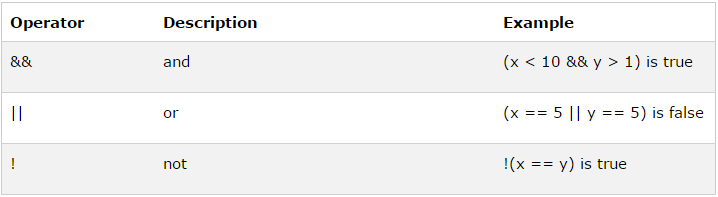
The while means that the do part repeats until the snake's food is not equivalent to the snake's head because we don't want food spawning there. The two ampersands in the middle (&&) simply mean that left and right conditions have to be true for the whole statement to be true. So if they are both true that means that the food is in fact on the head and the loop repeats. Heres some reference to logical operators:
Finally, we add
let gameOver = false;
let oppositeDirection = null;
let moveDirection = null;
as game variables. We set gameOver to false, and the directions to null since our snake hasn't moved yet.
Now we need to create a render() function. This function will be responsible for drawing our snake on the canvas. But first, we need to clarify the term function. A function in JavaScript is a reusable block of code that can be run simply by adding parentheses after the function name. Our function will be called render. Lets make it! Add this at the end of your file:
function render() {
    if (!gameOver) {
        let canvas = snakeCanvas;
        let ctx = canvas.getContext('2d');
        ctx.clearRect(0, 0, canvas.width, canvas.height);
        ctx.strokeStyle = 'black';
        ctx.fillStyle = 'red';
    }
 }
We declare functions by using the function keyword and then naming the function with parentheses. We then add brackets to define the body of the function (the code to be run). An if statement is used to test a condition. An if statement converts the value inputted in the parentheses to a boolean. A boolean value has a true or false state. What we are saying is that if gameOver is true then run that code. If gameOver is false, it won't run the code and it'll skip over the whole block. However the exclamation mark in front of gameOver reverses the output, making it run when it is false and skip over when it is true.
We declare canvas as a variable of snakeCanvas which copies the value over. Now we get a "context" object which is used to draw on a canvas. The canvas has a method to set up "context" for 2d drawing. We clear the screen for a new frame by running the clearRect method which takes a x and y coordinate for a starting position, and a x and y for the ending. It clears the area in between those. We also set the stroke color to black and the fill color to red.
Right now our render() function only sets up the canvas and sets colors. We need it to draw the body blocks, the head block, and the food block. To do this, add this code at the end of the program but before the second to last }. It should be inside the if block.
ctx.fillRect(snakeCoords.H.x, snakeCoords.H.y, pixelsPerBlock, pixelsPerBlock);
ctx.fillStyle = 'black';
for (let obj of snakeCoords.B) {
    ctx.fillRect(obj.x, obj.y, pixelsPerBlock, pixelsPerBlock);
}
ctx.fillStyle = 'green';
ctx.fillRect(snakeCoords.F.x,snakeCoords.F.y,pixelsPerBlock,pixelsPerBlock,);
scoreDisplay.innerHTML = `Score: ${score}`;
lengthDisplay.innerHTML = `Length: ${length}`;
To draw our head, we first access the "head" object of our snake by referring to snakeCoords.H. This gives us the object that looks like this: {x: centerX, y: centerY}. Now however, we need to go further deep and get the x and y coordinates. To do this we can chain dot notation and simply add another dot and x or y after snakeCoords.H. So access H first, and then the key x inside that object.
Inside ctx.fillRect(), we define the two top-left starting coordinates as the first two parameters and then the length to go from each coordinate for the last 2. This is a built-in canvas function that draws a block on the screen.
For the body blocks, we change the fill color, then begin a loop through snakeCoords.B. let obj of loops through whatever element is after the of and assigns obj as that element. Since snakeCoords.B is after the of the loop loops through every object in that array. That object's coordinates can now be accessible with obj.x and obj.y. We do the same thing, but over and over again until all the elements have been drawn. Then we repeat with the snakeCoords.F key in our object to access the coordinates and draw our food block.
Finally, we change the innerHTML properties of our score and length elements to the current score and length. Backticks are used in JavaScript to add variables in text. We can use the dollar sign and then add brackets to add our variable inside the quotes.
Finally, add render(); immediately after let moveDirection = null;. This calls the function for an initial render, and we'll remove it later.
That's it for this milestone! You should have a render working with score and length variables. Be sure to check milestone-1 for accuracy.
Milestone 2
In this milestone we'll make our main() function and begin adding the components of our main loop!
Lets start off by making our main loop. Remove the
render();
statement and add this after let moveDirection = null;:
function main() {
  moveSnake();

  checkBounds();
  gameOver = checkPassThrough(snakeCoords.H);

  render();
  if (gameOver) {
    clearInterval(repeat);
  }
}
This is our main() function. First it calls moveSnake() to move the snake. It calls two conditionals, checkBounds() and checkPassThrough(obj). Finally, it renders the display. If the game is over, it calls a function clearInterval(repeat); clearInterval is a method used for stopping the repetition of our main loop. It takes the reptition variable to figure out which repititon to clear. Add this line after let moveDirection = null;:
let repeat = window.setInterval(main, interval);
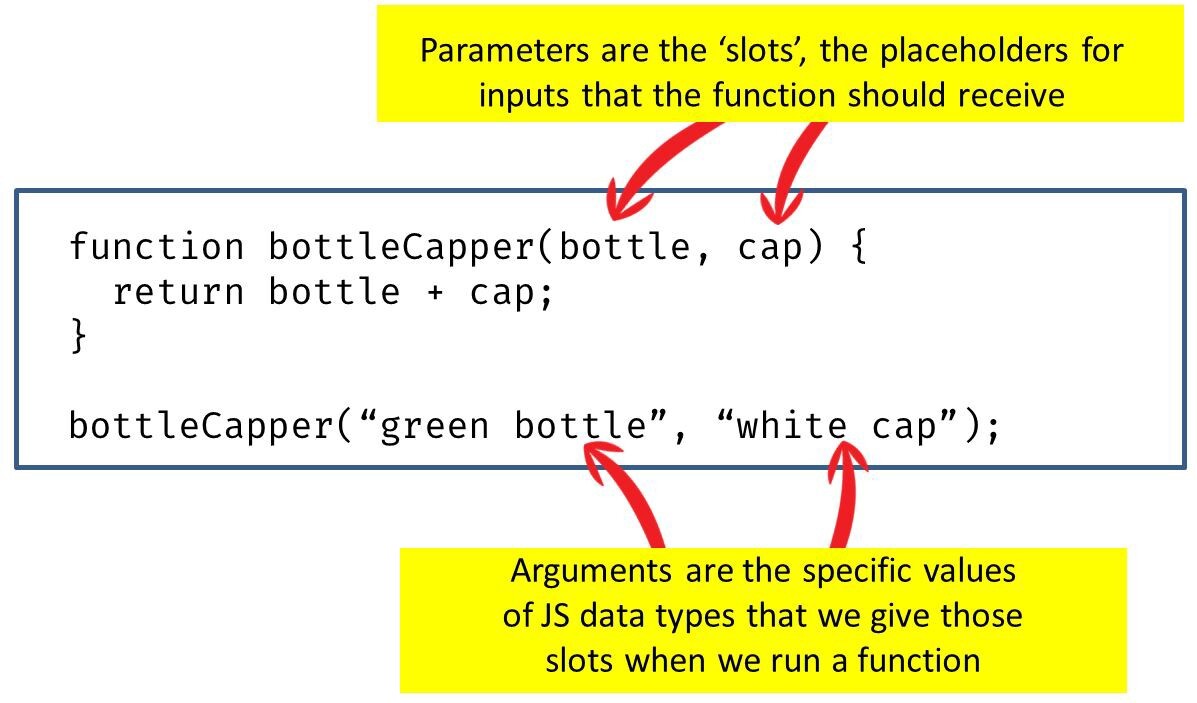
This line starts an interval on the window object. It repeats the function specified in its first argument and takes a duration in the second argument. Arguments in JavaScript are variables passed to a function. They can be used in a function when otherwise the variable would not be available. The repeat variable is used to clear the interval too, as seen above. Every interval miliseconds, main() will repeat automatically! Here's a small reference:
Let's create our moveSnake() function now. This function moves our snake in moveDirection. Its right here and you should add it after the last bracket of main():
function moveSnake() {
    if (moveDirection === null) {
        return;
    }
    snakeCoords.B.unshift({ x: snakeCoords.H.x, y: snakeCoords.H.y });

    if (moveDirection === 'up') {
        snakeCoords.H.y -= pixelsPerBlock;
    } else if (moveDirection === 'down') {
        snakeCoords.H.y += pixelsPerBlock;
    } else if (moveDirection === 'right') {
        snakeCoords.H.x += pixelsPerBlock;
    } else {
        snakeCoords.H.x -= pixelsPerBlock;
    }
    snakeCoords.B.pop();
}
This function looks daunting, but trust me, it's not. For example, the first if statement simply calls the return keyword if moveDirection is null. The return keyword simply breaks the function in our case. Null is used as "nothing" in our case.
To move the snake, we first need to add the current head object into the body. Then we make a new head, and remove the last body object to make the snake move. snakeCoords.B.unshift({ x: snakeCoords.H.x, y: snakeCoords.H.y }); uses an array's unshift method to add an element to the beginning. We create a new object with the snake head's coordinates and add that. Next, we use a if/else/else if statement to change the head's coordinates in the corresponding direction. If the snake moves up, the canvas coordinates decrease. Therefore we decrease the coords by pixelsPerBlock meaning one block.
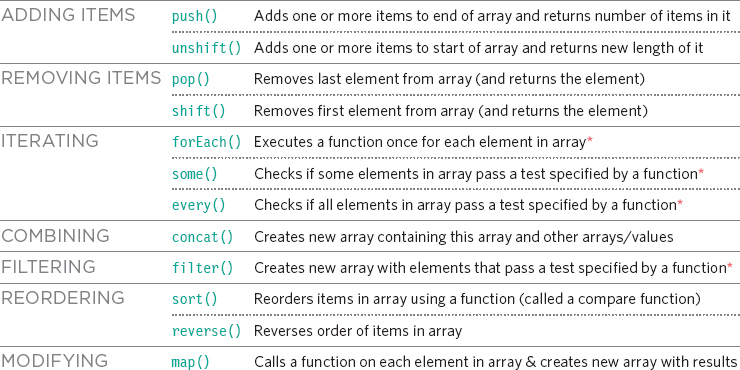
Finally we use an array's pop method to remove the last object. Check out these different array methods:
That function is now done, so code this this new function after the closing bracket of the moveSnake() function:
function checkBounds() {
    if (
        snakeCoords.H.x < 0 ||
        snakeCoords.H.x > snakeCanvas.width - pixelsPerBlock ||
        snakeCoords.H.y < 0 ||
        snakeCoords.H.y > snakeCanvas.height - pixelsPerBlock
    ) {
        gameOver = true;
    }
}
checkBounds() uses || (or) statements. This means that one of the conditions either on the left or right side has to be true for the whole statement to evaluate to true. Therefore, if even one of the boundaries is true (meaning that our snake is outside of them) our whole snake is out. Then, the game is over.
For our last function we will check the passthrough of the snake relative to the body. Type this in after the closing bracket of checkBounds():
function checkPassThrough(obj) {
    if (!gameOver) {
        return(
            snakeCoords.B.findIndex(item => {
                return obj.x === item.x && obj.y === item.y;
            }) !== -1
        );
    } else {
        return gameOver;
    }
}
After making sure the game isn't over, we use an array method called findIndex() it takes a function as an argument and calls it for each element in the array. If the returned value is true it returns the index else it returns -1. That's it for milestone-2! Check your work and then continue!
Milestone 3 We're almost done!!!
In this milestone we'll add our event listener, modify our main() and moveSnake(), and make our checkFood() function.
Let's create our event listener. Add this right after let repeat = window.setInterval(main, interval);:
document.addEventListener('keydown', event => {
    event.preventDefault();
    let direction = eventKeysToDirection[event.key] || moveDirection;
    moveDirection = direction === oppositeDirection ? moveDirection : direction;
});
The document gets a listener on a keydown event. Whenever the event happens, we prevent the default action which is to scroll and can be annoying. We change the direction to the event.key taken from our object, and if it is null make it equal to moveDirection. We finally add a check to make sure our direction isn't opposite direction. We do this to make sure our snake can move in the direction because it can't move in on itself.
Now lets make our checkFood() function. Add this right before function render() {:
function checkFood() {
    if (
        snakeCoords.H.x === snakeCoords.F.x &&
        snakeCoords.H.y === snakeCoords.F.y &&
        !gameOver
    ) {
          do {
              snakeCoords.F = {
                  x: Math.floor(Math.random() * blocksX) * pixelsPerBlock,
                  y: Math.floor(Math.random() * blocksY) * pixelsPerBlock,
              };
          } while (
              (snakeCoords.F.x === snakeCoords.H.x &&
                  snakeCoords.F.y === snakeCoords.H.y) ||
              checkPassThrough(snakeCoords.F)
          );
        for (let i = 0; i < 3; i++) {
            snakeCoords.B.push(0);
        }
        score++;
        length += 3;
    }
}
First we check if our snake's head is on top of the food and make sure the game isn't over. We repeat our do while logic until the food isn't on top of our snake and isn't on our snake's head. We add dummy data(zeroes) at the end of our snake's body to enlarge the snake gradually and update our score/length variables.
After the checkPassThrough(snakeCoords.H); line in our main() function, add checkFood(); to call our food function. In our moveSnake(); function, add this block of code after snakeCoords.B.pop();:
if (snakeCoords.B.length > 0) {
  oppositeDirection = oppositeDirections[moveDirection];
}
All this does is makes a oppositeDirection variable to decide where the snake can't go. We only do this if the length is bigger than one.
And we're done!
Congrats! You can check the final code for accuracy and mess around with the result. Fiddle colors, add custom CSS, the choice is yours! If you need inspiration, here are some extensions you can try making:
- The snake game with a play button. You don't have to refresh to play again. Here's the demo
- The snake game with added sounds!. Whenever the snake bumps into something or eats food it plays a sound! Here's the demo
- Rainbow colors. Right now our snake is looking a bit bland.... Why don't we add rainbow colors to it??? Plus, we'll make it flash!!! Here's the demo
Feel free to ping me with any questions/concerns on Slack (@Gurshan), or my github. Show off your creations in #ship too!