

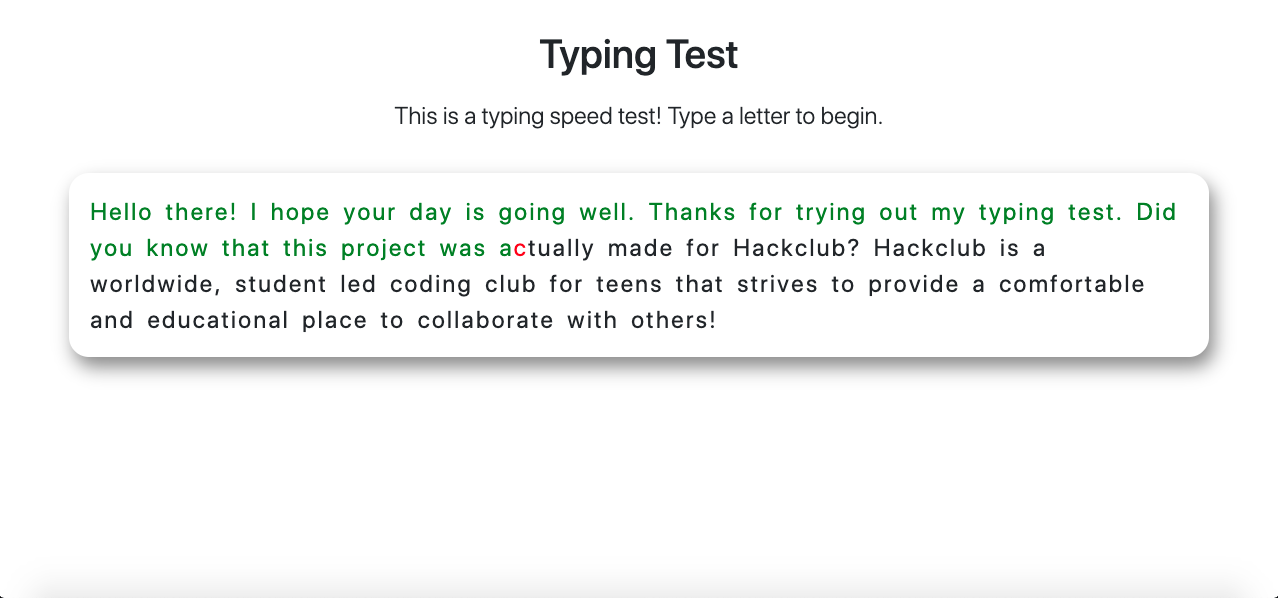
In this workshop, you're going to build a typing test website with HTML, CSS, and JavaScript! Here's what it'll look like:
Prerequisites
This project will be more fun to code if you have a general understanding of HTML, CSS, and JavaScript. However, don't worry if you don't because you can definitely complete this workshop without any prerequisites.
The IDE
An IDE (Integrated Development Environment) is just fancy speak for where your code will run. We'll be using repl.it as our IDE because...
- It saves your code in the cloud
- All you need is an internet connection and a web browser
- It's really easy to fork (copy) from
Let's start!
Step 0: Forking the starter repl
To fork (copy) the starter template,
- Navigate to the Starter Template
- Edit anything and the template will be copied as one of your repls
- Click on the run button to run the website, and click on the "open in a new tab" button on the right of the url inside the repl's output.
Step 1: Explaining the starter template
Now that you've forked the starter project, let's quickly go over the code that was just dumped in your lap:
In the index.html file, we're:
- Setting some metadata
- Importing Bootstrap, which will help us style our website
- Linking the
style.cssfile to theindex.htmlfile - Setting up the content on the website (the purpose of each line will become clear as we go along)
- Import Bootstrap's scripts
- Importing our
script.jsfile
In the style.css file, we're just setting up some initial styles.
In the script.js file, we're selecting some elements from our HTML file so that we can easily modify them in the workshop.
If you're curious to see what the starter code outputs, click the green "Run" button at the top of the page.
If you don't understand some of the code, you're welcome to ask your club leader or someone around you for some help. But don't worry about understanding every single line—it'll become a lot clearer as we go along.
Step 2: Coding our JavaScript
Let's start writing some JavaScript! Our program will be split up into three blocks that provide functionality: handleKey(key), handleEnd(), and the event listener. We'll also have variables defined at the beginning to assist these three blocks. Let me explain how our program will flow:
- First we'll declare variables for our text, time, position, etc.
- Then we'll start our event listener. Everytime a key is pressed it will check if the key is a valid symbol or letter. It'll forward the key to
handleKey(key)if it is, otherwise ignore it. - Every time
handleKey(key)gets a character, it checks it against the text. If it's correct it increments the position in the text and changes the letter's color to green. Otherwise it changes it to red and sets abackspaceNeededvariable. - When the user is done typing, the
handleEnd()function computes the results, changes the CSSdisplayproperty, and modifies the HTML content.
We'll code our program section by section!
Section 1:
All the variables we declare on the top will be available to our functions! So we don't have to worry about variable accessibility.
Lets start off by creating an invalidKeys array and a text string. Navigate to the script.js file (if you aren't there already) and add this at the end of the file:
const invalidKeys = 'F1 F2 F3 F4 F5 F6 F7 F8 F9 F10 F11 F12 Escape Tab CapsLock Shift Control Alt Meta ArrowLeft ArrowRight ArrowDown ArrowUp Enter'.split(
    ' ',
);
const text =
    'Hello there! I hope your day is going well. Thanks for trying out my typing test. Did you know that this project was actually made for Hackclub? Hackclub is a worldwide, student led coding club for teens that strives to provide a comfortable and educational place to collaborate with others!';
The first variable is used by our event listener and lists all the keys we won't count as errors when typing. We use JavaScript's built-in split() function to separate the string into an array.
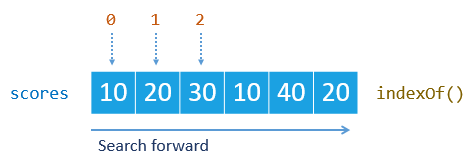
An array in JavaScript is a variable that can store a list of many variables. A specific variable inside an array is accesible by an index value that starts at zero. Index 0 corresponds to the first element in the array. Index 1 contributes to the second, and so on. Arrays are initialized like this: let array = ['string', 'apple'].
The split() function splits a string into an array based on a delimeter. The delimeter is the string we add in its parantheses as a parameter. So every time it sees the parameter we passed in, it makes a new array element.
Finally we have a string that defines what text we'll add for our typing test. Add this at the end:
const textArr = text.split('');
const htmlArr = textArr.map((item, index, array) => {
    if (item === ' ') {
        return `<span class="space" id="span${index}">${item}</span>`;
    }
    return `<span class="char" id="span${index}">${item}</span>`;
});
We split our text string into an array for easier checking. Now, every letter is an element in the array.
To show text in our HTML, we'll need to split every letter into a <span> element. We use JavaScript's map() method to make a new array based on a certain condition. map() goes through textArr and calls a function. That function is used to tell the map() function what to add into the new array. Whatever the function returns, the map() function adds in to htmlArr. If the character in textArr is a space we assign a different CSS class.
A new syntax is used: `span${index}`. These backticks allow you to easily enter variables in a string. Use the dollar sign and brackets to add in a variable. Now, lets add in the final variables at the end:
let errors = [];
textContainer.innerHTML = htmlArr.join('');
let firstTime = true;
let currentPos = 0;
let backspaceNeeded = false;
let currentTime = 0;
let repeat;
I'll go over this line by line. We make an empty errors array to store any mistakes made when typing. We join together the <span> elements in our htmlArr into a string using the join() function. That function joins all elements of an array together with a string in between. We make a firstTime variable to check if it's the user's first letter typed.
currentPos is a counter used to track the position of the user in the textArr array. backspaceNeeded tells the program that a backspace has to be typed to continue. currentTime simply stores the time in seconds, and repeat is used to set an interval for the timer. I'll get back to the interval later.
Section 2:
Now that we've declared all of our variables, we need to start our event listener. The event listener simply consists of a function that runs when a key is pressed. The event listener will call the handleKey(key) function that takes care of the key that was pressed. Add this code at the end of your file:
document.addEventListener('keydown', event => {
    if (event.key === ' ') {
        event.preventDefault();
    }
    if (firstTime) {
        firstTime = false;
        repeat = setInterval(() => currentTime++, 1000);
    }
    if (event.location === 0 && !invalidKeys.includes(event.key)) {
        handleKey(event.key);
    }
});
We add a listener on the JavaScript document variable, using JavaScript's built in method called addEventListener('eventType', function). This function adds a listener on whatever variable we call it from. Since we called it from document it adds one on the whole page. The function takes two arguments: the type of event that will call the function, and the code to run once the event happens.

The first argument is the 'keydown' string. This string tells the listener to activate once any key is pressed down. The second argument is a function. That function is called whenever our listener picks up a 'keydown' event. The function takes one argument: the event variable. This variable contains information about our event.
The function we use first checks if event.key is a space (empty string). It does this by using the === operator. That operator compares two values. If they are the same it returns true. To check what event's properties are on a certain keypress, check out keycode.info.
event.key returns the literal string representation of the key that was pressed. If it is a space, we use the event preventDefault() function. That function prevents the normal behavior of the key. Without this, whenever we type a space the page scrolls automatically to the end (which is very annoying).
We then check if it's the first key that was typed. The code in an if statement in JavaScript runs if the condition in the parentheses is true. Otherwise it skips over. Since firstTime is literally set to true, the code runs. The code first changes the variable to false so that it doesn't run again, and sets an interval.
setInterval() repeats a function periodically. We give it a time in miliseconds to repeat, and a function to call. The function inside of it is called an arrow function.
Arrow functions are just normal functions but shorthand. The first part of our arrow function is (). () is usually where parameters would go. A parameter is a variable given to a function to allow the variable's use inside the function. We need no parameters, so we give it an empty value. We then use => to represent that it's an arrow function. After => we write our function normally. Our function's body in this case just increments the currentTime by 1. ++ is an operator that increases the value of the operand by 1 (just increases the currentTime variable, and it repeats every 1000 miliseconds (1 second), so it's basically a timer we created).
We do another equality check, this time making sure that the location property of the event is 0, and making sure that the key isn't inside our invalidKeys array. The location property being zero means that the key was one of the general key presses. Additionally we use our array invalidKeys's, built-in includes() method to check if an element is inside that array.
The ! operator reverses the outcome of the condition. So if the key is inside invalidKeys it'll return true but we need it to return false. So we add the ! in the front. In the middle we use an two ampersands (&&) to influence our if condition. Basically the operator means that if the condition on the left and right are both true, only then will the whole condition be true. That way we can be sure that the key is okay to be included.
We finally call our handleKey(key) function, and give the function access to our key. We'll make this next, but first a final code check.
Check In
At this point, your JavaScript file should look like this:
'use strict';
let main = document.getElementById('main');
let textContainer = document.getElementById('text-container');
let resultsContainer = document.getElementById('results');
let wpmText = document.getElementById('wpm');
let accuracyText = document.getElementById('accuracy');
let timeText = document.getElementById('time');

const invalidKeys = 'F1 F2 F3 F4 F5 F6 F7 F8 F9 F10 F11 F12 Escape Tab CapsLock Shift Control Alt Meta ArrowLeft ArrowRight ArrowDown ArrowUp Enter'.split(
    ' ',
);
const text = 'Hello there! I hope your day is going well. Thanks for trying out my typing test. Did you know that this project was actually made for Hackclub? Hackclub is a worldwide, student led coding club for teens that strives to provide a comfortable and educational place to collaborate with others!';
const textArr = text.split('');
const htmlArr = textArr.map((item, index, array) => {
    if (item === ' ') {
        return `<span class="space" id="span${index}">${item}</span>`;
    }
    return `<span class="char" id="span${index}">${item}</span>`;
});
let errors = [];
textContainer.innerHTML = htmlArr.join('');
let firstTime = true;
let currentPos = 0;
let backspaceNeeded = false;
let currentTime = 0;
let repeat;

document.addEventListener('keydown', event => {
    if (event.key === ' ') {
        event.preventDefault();
    }
    if (firstTime) {
        firstTime = false;
        repeat = setInterval(() => currentTime++, 1000);
    }
    if (event.location === 0 && !invalidKeys.includes(event.key)) {
        handleKey(event.key);
    }
});
Section 3:
In this section we make our handleKey(key) function! This function changes the color of the key, changes the position of the key in the array, and forces backspaces. To start, add this at the end of the script.js file:
function handleKey(key) {
    let span = document.getElementById(`span${currentPos}`).style;
    if (!backspaceNeeded) {
        if (key === textArr[currentPos]) {
            span.color = 'green';
            currentPos++;
        } else {
            if (textArr[currentPos] === ' ') {
                span.backgroundColor = 'red';
            } else {
                span.color = 'red';
            }
            backspaceNeeded = true;
            errors.push(textArr[currentPos]);
        }
    } else {
        if (event.key === 'Backspace') {
            if (textArr[currentPos] === ' ') {
                span.backgroundColor = 'transparent';
            } else {
                span.color = 'black';
            }
            backspaceNeeded = false;
        }
    }
    if (currentPos === textArr.length) {
        clearInterval(repeat);
        handleEnd();
    }
}
We first get the span element that corresponds with the current position. We get its style property to modify the CSS.
By using if (!backspaceNeeded) { We make sure the there isn't a backspace needed. Meaning, we make sure the backspaceNeeded isn't true. If it isn't, we validate the key pressed by comparing its equality with the current position in the textArr. textArr[currentPos] means that we are accessing the element at currentPos index of the array. If it's correct we set the color to green (span.color = 'green';) by using the CSS color property, and increment the currentPos variable. ++ means to increase the value before it by 1.
If the pressed key isn't correct, meaning that the else statement gets executed, we check if the current letter inside textArr is a space or letter in another if statement. A space refers to ' ' and it's a letter if it isn't a space. We then change either the backgroundColor or the color. backgroundColor is required to be changed if the letter in textArr (the letter the user needs to type) is a space since color only applies to text. If it isn't correct we also set backspaceNeeded to true and add the letter into the errors array.
The push() method is a method used on arrays to add an element at the end of the array. We add the letter that was supposed to be typed at the end of the errors array so that we can log how many errors the user made.
If there is a backspace needed, we only execute code if the key is a backspace. We do this so that our program doesn't continue when a backspace is needed. After doing the appropriate check for space or letter, we change the color to black if it's a letter, and transparent if it's a space. transparent is the default backgroundColor and black is the default color in our case. This resets the colors back to normal. Finally we reset the backspaceNeeded variable if the key pressed was indeed a backspace.
At the end we make sure that if the current position has been incremented to textArr.length, we stop the timer function by doing clearInterval(repeat). This takes the setInterval() method's variable repeat that we assigned, and stops it from repeating. We finally call our handleEnd() function to show the results. Since array indexes reference one more than the index value having an index equivalent to the array's length would reference a non-existant value. Therefore we know that we have reached the end of the program.
Section 4:
Now we need to add the final segement of our code: the handleEnd() function. This function calculates the results, modifies the HTML, and changes the display properties that hide the results. Add this at the end:
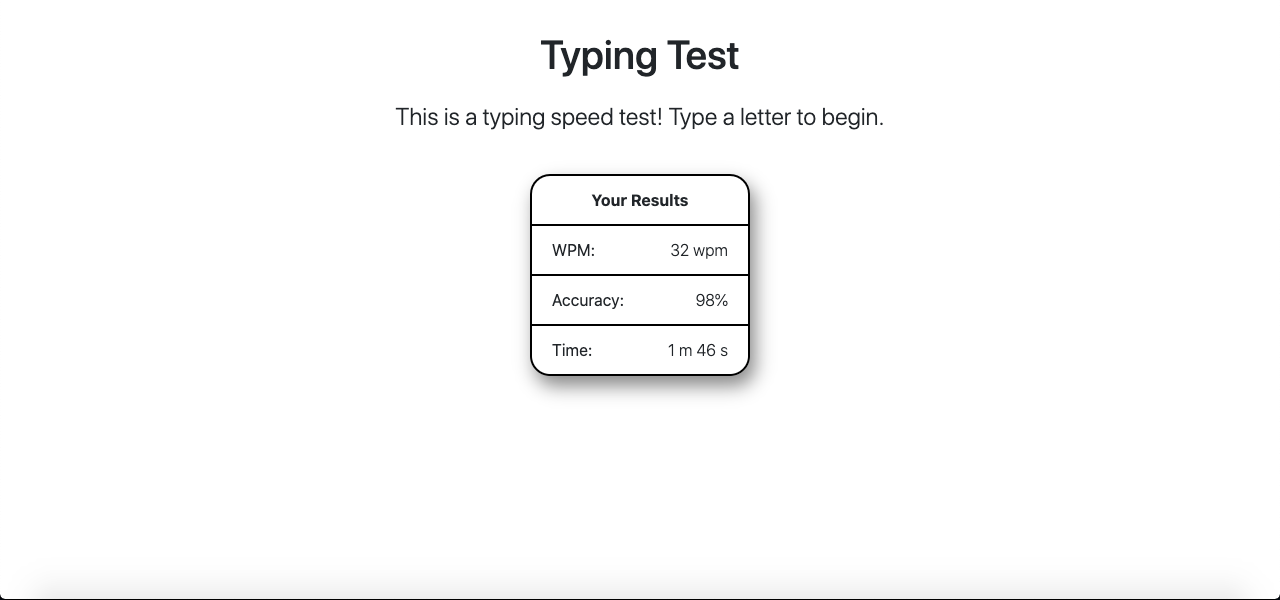
function handleEnd() {
    let wpm = Math.floor(textArr.length / 5 / (currentTime / 60));
    let accuracy = Math.floor(
        ((textArr.length - errors.length) / textArr.length) * 100,
    );
    let multiples = Math.floor(currentTime / 60);
    let seconds = currentTime - multiples * 60;
    wpmText.innerHTML = `${wpm} wpm`;
    accuracyText.innerHTML = `${accuracy}%`;
    timeText.innerHTML = `${multiples} m ${seconds} s`;
    main.style.display = 'none';
    resultsContainer.style.display = 'block';
}
First off, we calculate the time, the wpm, and the accuracy. If you want to learn how they are calculated, refer to this site. But basically, we use Math.floor() to round results down, and divide by integers to compute our result. We finally store them in variables. JavaScript math operations follow the order of operations (PEMDAS). Therefore we can ensure that our result is accurate.
As for the time, we get the minutes first. To get the minutes we divide the time by 60. The remainder is chopped off because we use Math.floor() (Math.floor() rounds the result down). We then store the leftover seconds in seconds. We modify the innerHTML properties of our wpmText, accuracyText, and timeText variables. Remember that these variables were declared at the very top of our file and refer to HTML elements.
Finally, we set the display of our main container to 'none' and the resultsContainer to 'block'. We can do this by referencing the HTML style attribute. The style attribute adds an inline style to the HTML element. To create the style attribute we can reference it as an object key. We can then add CSS styles inside of it. Our style hides the text and shows the results by using the CSS display property. Remember we set the display of our resultsContainer to none? Our JavaScript style attribute overrides that property and returns the resultsContainer back to its default value. We now set a new property on the main container to hide it.
Step 3: Hacking

Thats it! We've finished coding the typing test workshop. You should feel proud of yourself because you learned many new skills such as functions, backticks, operators, if statements, and more! This workshop is pretty hackable, though. Here are some examples of extending it:
- A try again button! We can add a try again button to our workshop. Here's the final demo and the source code.
- Save our results in
localStorage.localStorageis a place on a user's browser to store data. We can store the results there, and fetch them every time we complete the typing test! The final demo and the source code. - Add a nice little navbar. We can add a navbar that links to your github and has a link to Hackclub. Just make sure to read the comment inside the HTML file. The final demo and the source code.
A version with all of these features is here
If you have any questions, you can message me on Slack or visit my GitHub.