

Databases are often used in projects to persist and store data associated with certain users. In this workshop, you'll be building your very own database with the power of JavaScript!
Prerequisites
Before starting this workshop, you should ideally have knowledge of:
- Basic JavaScript syntax
- Asynchronous programming (explained in workshop, but it'd be nice to have been introduced to it before)
- Using the
npmtool to manage dependencies - Basic HTTP methods
Getting Started
We're going to be using repl.it, a free, online code editor, to write our code. Create a new Node.js project by visiting repl.it/languages/nodejs.
To get started, we'll need to
- Initialize an
npmproject - Install the dependencies associated with it. In this case, we'll need
express(a web server framework) andcors(an express middleware).
To do this, head over to the Shell tab and run:
# Initialize an npm project in the current directory. The --yes "flag" accepts default values when prompted.
npm init --yes

# Install (shorthand: i) both the express and cors packages for our project
npm [i/install] express cors

You can safely ignore the warnings, they're not important to our project!
Next, let's write out a basic web server. Here's what that would look like with express:
// "Import" the express and cors modules
const express = require('express')
const cors = require('cors')

// Create our basic app
const app = express()
app.use(cors())

// Run the server either on the PORT environment variable or, if that's not present, port 3000!
const PORT = process.env.PORT || 3000

// When someone sends a GET request to `/`, respond with "Hello World"!
app.get('/', (req, res) => {
  res.send('hello world!')
})

// Start listening on the port we specified earlier
app.listen(PORT, () => {
  console.log(`Listening on ${PORT}`)
})
Now, let's run this! Hit the big green run button on the top of your editor to do so:

Awesome! We'll head over to hoppscotch to finish up this basic server. Hoppscotch is an awesome website to send HTTP requests to a remote server! Let's sent a GET request the root (/) of our server.
Copy the URL of your repl (in the format: https://PROJECTNAME.YOURUSERNAME.repl.co) and set the request type to GET. The screenshow below shows what this step looks like for me:
In the screenshot below, I've copied in the URL of my REPL (in the format: https://<PROJECT_NAME>.<USERNAME>.repl.co) and set the request type to GET.
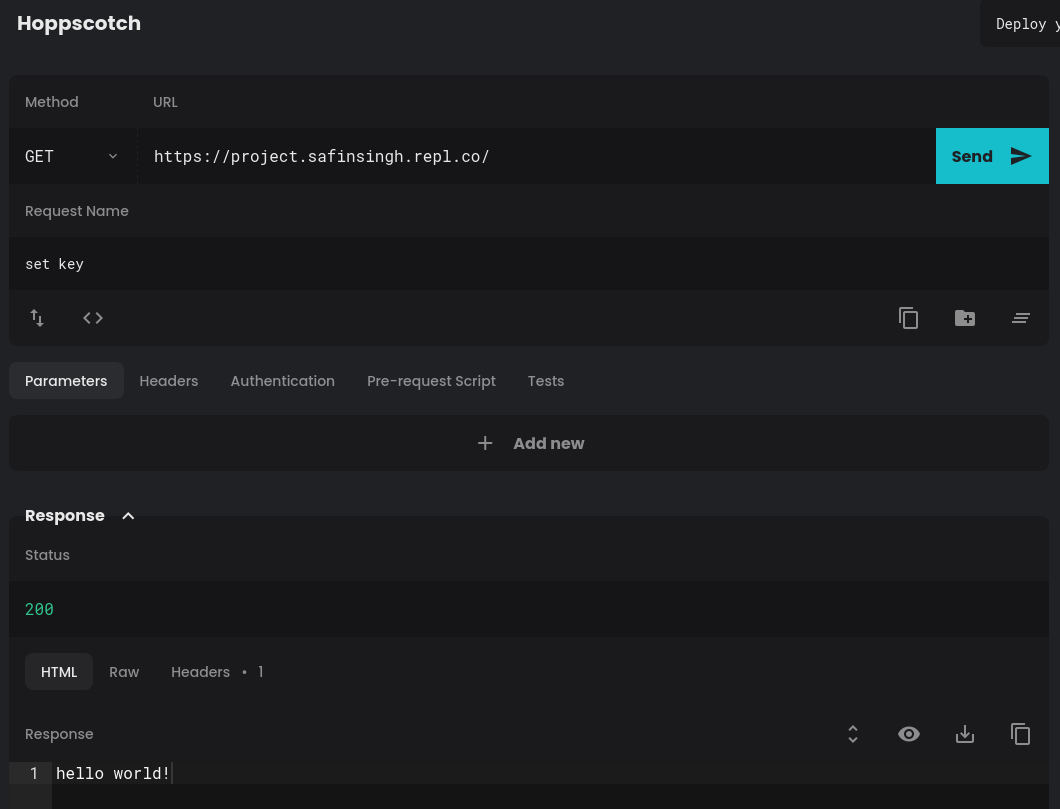
Finally, hit Send! You should get a plain response like so:
hello world!
Alright, that was probably a lot to take in. Let's backtrack a little and answer a couple questions!
- Q: Why did we install the
corspackage?- A: CORS, also known as Cross-Origin Resource Sharing, is a method in which you may define external hosts (called origins) from which the server should permit resources. In this case, since we're requesting the data from
hoppscotch, we'll need to add middleware forexpressto allow it to respond correctly.
- A: CORS, also known as Cross-Origin Resource Sharing, is a method in which you may define external hosts (called origins) from which the server should permit resources. In this case, since we're requesting the data from
- Q: What's middleware?
- A: Typically, middleware is software that you can embed into some sort of pre-existing application and instruct it to execute before or after it performs an operation. In our case, we're using CORS middleware to set the correct HTTP headers before we send responses.
Cool! Now, let's start working on the core of our database—the method with which we'll alter it. Before we get started, it's worth mentioning that we'll be working with a JSON file to serialize our data to. Effectively, we're using JSON as a format to translate between raw text stored in a file and our code because JavaScript has some really nice built-in abstractions for it. We're also going to be utilizing asynchronous functions from JavaScript's standard fs module. What does asynchronous mean? Let's take a look!
Node.js is a single-threaded event-loop JavaScript runtime. Essentially, this allows it to perform non-blocking I/O by abstracting asynchronous operations with Promises. You can spawn a specific promise and attach callbacks (functions) to it and execute those once the operation has been completed. For example:
const fs = require('fs')

fs.readFile('file', function (err, data) {
  if (err) console.error(err)
  console.log(data)
})
In this example, we're reading the file named file and execution the specified callback when this promise is fulfilled, or the operation is completed. However, this syntax can become quite tedious and repetitive with multiple nested callbacks. This is where the async and await keywords shine! Let's see how we can write the aforementioned snippet in "promisified" syntax:
const fs = require('fs').promises

async function doCoolStuff() {
  const data = await fs.readFile('file')
  return data
}

doCoolStuff().then(console.log).catch(console.error)
We're importing the promises module from within fs because it contains promisified methods for fs's methods already coded for us! Here, the await keyword pauses the execution of its parent async function, doCoolStuff, until the promise has been fulfilled. Then, we return the data variable. Finally, when we execute the function, console.log its return value with .then() and catch and log any possibe errors with .catch().
Now... this is all super cool, but how can it be applied to our database? Let's write some basic functions!
We'll need to create a new file, db.js, to do so. In this file, let's add some code to get all the entries in our JSON file:
const fs = require('fs').promises

// Create an empty file with whatever name you want; we'll be using this to store our data.
const STORE = './store.json'

async function getAll(_req) {
  // Read the file into a variable (and block function execution until it's done)
  const data = await fs.readFile(STORE)

  // fs.readFile returns a Buffer by default. We won't be going over exactly what a Buffer is, but we need to call the .toString() method to return the Buffer as a string
  return data.toString()
}
Here, we're importing fs.promises again and creating a new function called getAll. Because we don't actually care about the request body, we can prefix it with an underscore to signify that it's not being used. Let's test it out! First, we'll need to export it from db.js:
module.exports = {
  getAll // shorthand for getAll: getAll
}
Now, we can import it from index.js:
const db = require('./db')
We'll implement a little handler function to make adding more endpoints easier as well:
// Handle any endpoint given a request, response handler, and a method to call (from `db`)
async function handle(req, res, method) {
  // Log any request
  console.log('Recieved connection!')
  try {
    // Try to call our async function (specified in `method`). If this fails, jump over to the `catch` block and send an error
    const onSuccess = await method(req)
    // If it works, send a successful response with our data!
    res.send({ status: 'success', response: onSuccess })
  } catch (e) {
    res.send({ status: 'fail', error: e.message })
  }
}
Finally, we can attach the handle to a handler on our app:
app.get('/getAll', async (req, res) => handle(req, res, db.getAll))
Awesome! Our index.js should now look like this:
// "Import" the express and cors modules
const express = require('express')
const cors = require('cors')
const db = require('./db')

// Create our basic app
const app = express()
app.use(cors())

// Run the server either on the PORT environment variable or, if that's not present, port 3000!

const PORT = process.env.PORT || 3000
// Handle any endpoint given a request, response handler, and a method to call (from `db`)
async function handle(req, res, method) {
  // Log any request
  console.log('Recieved connection!')
  try {
    // Try to call our async function (specified in `method`). If this fails, jump over to the `catch` block and send an error
    const onSuccess = await method(req)
    // If it works, send a successful response with our data!
    res.send({ status: 'success', response: onSuccess })
  } catch (e) {
    res.send({ status: 'fail', error: e.message })
  }
}

app.get('/getAll', (req, res) => handle(req, res, db.getAll))

// Start listening on the port we specified earlier
app.listen(PORT, () => {
  console.log(`Listening on ${PORT}`)
})
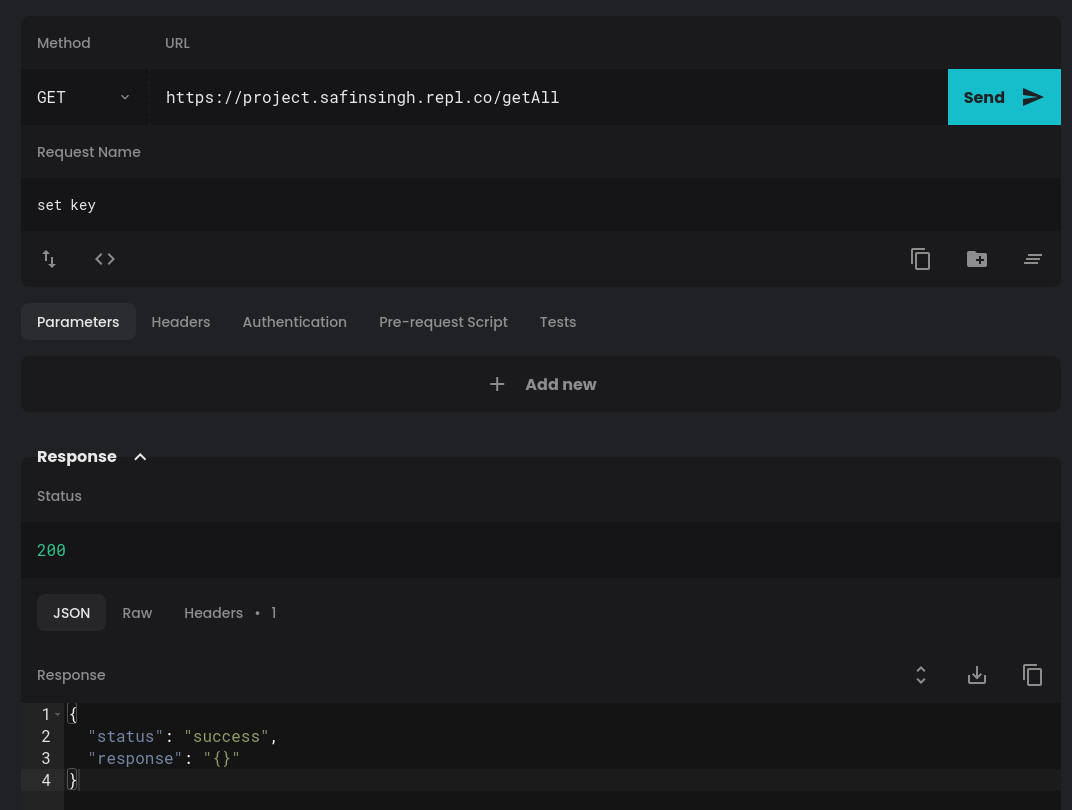
Now, head back to hoppscotch and send a request to /getAll! You should get back whatever you put in your STORE file:
Perfect! Now, let's try to add an endpoint for setting a key in your database:
async function set(req) {
  // extract the `key` and `value` properties from our request. express takes care of serializing our JSON request body to a JavaScript object with its built-in JSON middleware
  const { key, value } = req.body

  // Read our STORE
  const file = await fs.readFile(STORE)
  // Serialize, or parse, our JSON into an object
  const object = JSON.parse(file)

  // Merge the new object with your specified key and value. The spread (...) notation essentially expands the object in place. Because objects cannot have duplicate keys, any pre-existing keys are overwritten
  const newObject = {
    ...object,
    // You must specify square brackets around [key] in order to actually use the variable "key" as a key rather than the string "key"
    [key]: value
  }

  // Write our new object to the store (serialize, or stringify it, before doing so)
  await fs.writeFile(STORE, JSON.stringify(newObject))

  // Return exactly what was given to us as a way of saying "it worked!"
  return { [key]: value }
}

// ...

module.exports = {
  // ...
  set
}
As mentioned, we'll need to add the JSON middleware to our server (in index.js):
app.use(express.json())
And finally, add a handler for /set:
app.post('/set', async (req, res) => handle(req, res, db.set))
Notice that we specified /set as a POST request with app.post. This is because we'll need to provide a JSON body to this request.
Awesome! We should now be able to set keys! Let's hop back over to hoppscotch and test it:
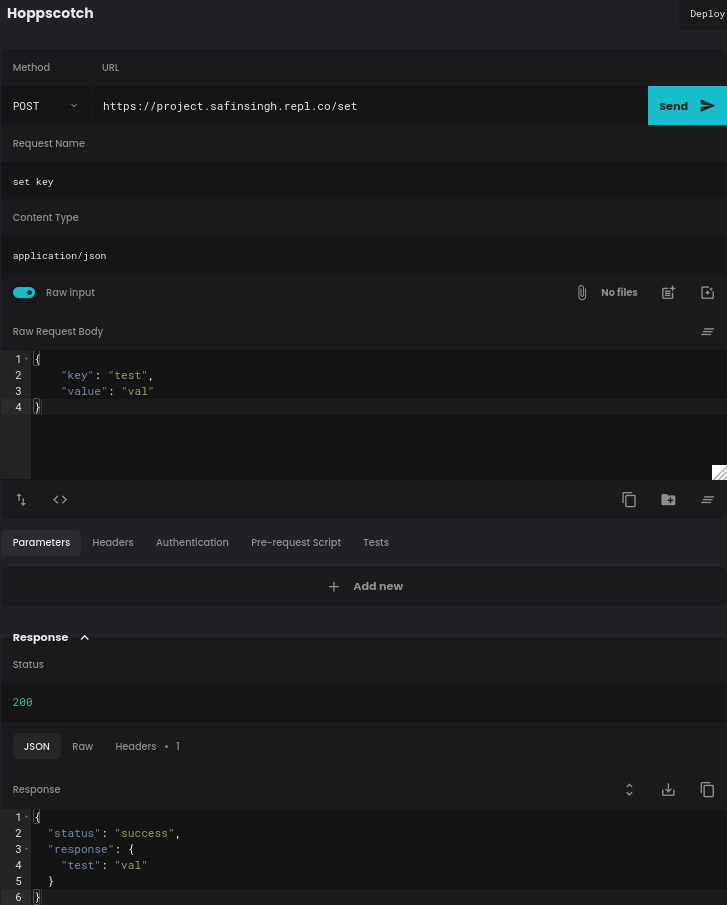

As you can see, we've set the HTTP request method to POST, added a body of:
{
  "key": "test",
  "value": "val"
}
Set your Content Type (HTTP header) to application/json, and hit Send!
Now that we've got our GET and POST endpoints working, let's add one more to clear our database! All we need to do is serialize an empty object and write that to our STORE. Let's add another function for this in db.js:
async function clear() {
  // Write an empty object to our file
  await fs.writeFile(STORE, JSON.stringify({}))

  // Return the new contents of the file ("{}")
  return await fs.readFile(STORE)
}
You know the drill! Export it from the file:
module.exports = {
  // ...,
  clear
}
Add a handler:
app.post('/clear', async (req, res) => handle(req, res, db.clear))
And send a POST request from hoppscotch! You should be good to go with the clear function!
Recap
Let's do a quick recap of what we just did!
- Used the
expressmodule to create a web server to run our database's API on - Used the
corsmodule to implement Cross-Origin Resource Sharing middleware for our server - Created GET and POST endpoints on a server:
/getAll(retrieve all entries from database)/set(set a key in the database)/clear(clear the database)
- Learned about asynchronous JavaScript and Node.js's event loop!
Great job, you've made it to the end! Here's the final product, for reference: https://repl.it/@SafinSingh/JsonDB
Here's some things you could do to possibly go further with our database:
- Implement an endpoint to get a certain key from our store (source)
- Store your data in YAML format rather than JSON (souce)
- Write logging middleware for express to make it easier to see who sent requests (source)
Here are some links to help you do those!
- Use JWTs to authenticate clients
- Example logging middleware for Express (No need to reinvent the wheel!)