
Do you like memes? Ever wanted to make your own, but didn't know which apps to install? Don't worry because in this workshop, you'll be creating your own Meme Generator—or as I like to call it, the Meme-Genie.
Let's get started!
Source code can be found here.
Part 1: Prerequisites
Basic knowledge of:
- HTML
- CSS
- JavaScript
Part 2: Setting Up The Environment
We'll be using an online code editor called repl.it for this workshop.
To get started, go to https://repl.it/languages/html. Your coding environment will spin up in just a few seconds!
Part 3: Building The Project
1) HTML
Let's start by making a structure for our Meme Generator website.
We'll be writing all our below code inside our <body> tag.
-
First, add a heading to the website using the
<h1>tag:<h1>Welcome to Meme-Genie 🧞 </h1> -
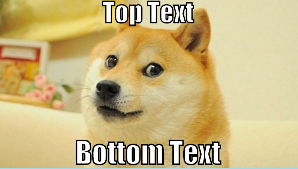
Next, we want our memes to have two text fields: Top Text and Bottom Text, something like this:
To achieve this we'll use two
<textarea>tags after our<h1>tag:<textarea id="top-text"></textarea> <textarea id="bottom-text"></textarea>Now we want "Text Size" sliders for both our top and bottom text. For this, we'll use the
<input type="range">HTML element. Add the following inputs under each textarea, like so:<textarea id="top-text"></textarea> Text size: <input type="range" id="top-text-size-input" min="0.05" max="0.25" value="0.15" step="0.01"><textarea id="bottom-text"></textarea> Text size: <input type="range" id="top-text-size-input" min="0.05" max="0.25" value="0.15" step="0.01">Here, the
minis the minimum text size,maxis the maximum text size,valueis the default value and thestepargument is the stepping interval or the precision of the slider. -
Next, we need to take a meme template as our
fileinput. For this we'll use<input>tags, specifying that we only want images as ourfileinput:<input type="file" id="image-input" accept="image/*">This will add a button on our website that'll let the user input a meme template as an image.
-
Next, we need a
Generatebutton:<button id="generate-btn">Generate!</button> -
But we need something to display our meme, right?
For this, we'll use an HTML5 Canvas:
<canvas id="meme-canvas" title="Right click to save this meme"></canvas>
Our HTML code so far:
<!DOCTYPE html>
<html lang="en">
<head>
<meta charset="utf-8">
<title>Meme Generator</title>
<link rel="stylesheet" href="style.css">
</head>
<body>
<h1>Welcome to Meme-Genie 🧞 </h1>
<textarea id="top-text"></textarea>
Text size: <input type="range" id="top-text-size-input" min="0.05" max="0.25" value="0.15" step="0.01">
<textarea id="bottom-text"></textarea>
Text size: <input type="range" id="bottom-text-size-input" min="0.05" max="0.25" value="0.15" step="0.01">
<input type="file" id="image-input" accept="image/*">
<button id="generate-btn">Generate!</button>
<canvas id="meme-canvas" title="Right click to save this meme"></canvas>
<script src="script.js"></script>
</body>
</html>
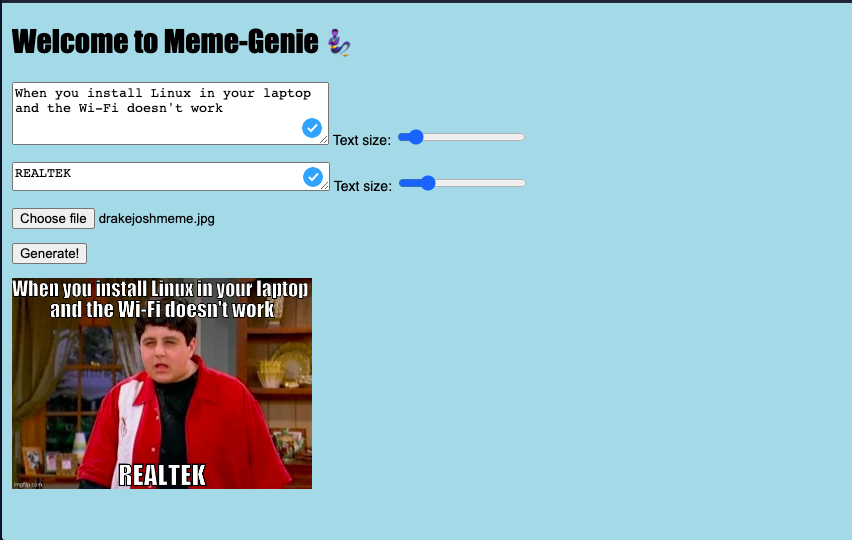
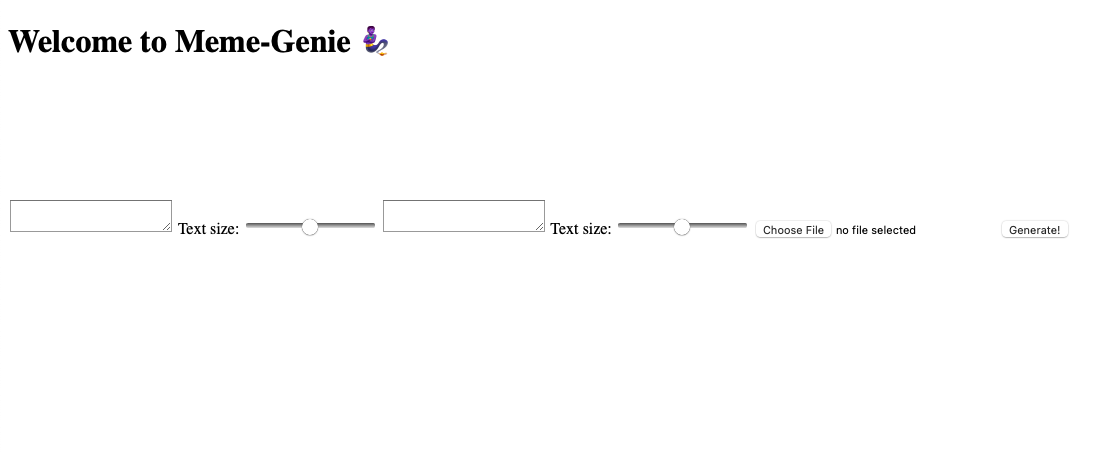
If you run the website now by clicking the green "Run" button at the top, you'll notice that the elements look kinda weird, something like this:
To fix this problem, we have the mighty <div> tag which we'll be using to seperate out the different elements!
So, wrap all the different elements inside the <div> tags, like this:
<!DOCTYPE html>
<html lang="en">
    <head>
        <meta charset="utf-8">
        <title>Meme Generator</title>
        <link rel="stylesheet" href="style.css">
    </head>
    <body>
        <h1>Welcome to Meme-Genie 🧞 </h1>
        <div>
            <textarea id="top-text"></textarea>
            Text size: <input type="range" id="top-text-size-input" min="0.05" max="0.25" value="0.15" step="0.01">
        </div>
        <div>
            <textarea id="bottom-text"></textarea>
            Text size: <input type="range" id="bottom-text-size-input" min="0.05" max="0.25" value="0.15" step="0.01">
        </div>
        <div>
            <input type="file" id="image-input" accept="image/*">
        </div>
        <div>
            <button id="generate-btn">Generate!</button>
        </div>
            <canvas id="meme-canvas" title="Right click to save this meme"></canvas>
        <script src="script.js"></script>
    </body>
</html>
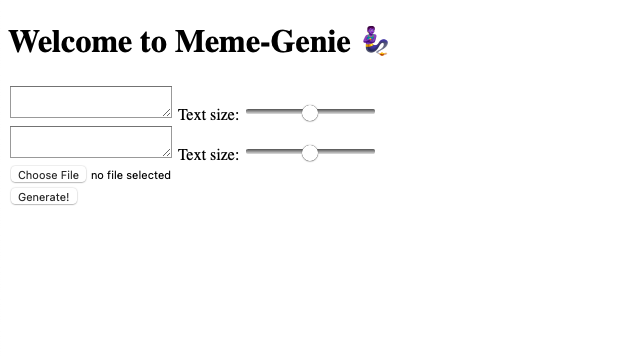
Now run the website again. It should look something like this:
And with this we've completed the HTML part!
2) CSS
Next, let's add some basic styling to our website. Navigate to the style.css file and add the following code:
h1 {
  font-family: Impact, 'Arial Narrow Bold', sans-serif;
  font-size: 30px;
}

body {
  margin: 10px;
  background-color: lightblue;
}

#meme-canvas {
  width: 300px;
}
In this CSS file:
- We first change the heading's font to Impact (the "meme font"), with a fallback to Arial if the user doesn't have Impact for some reason. Then, we make the text of the heading a little bigger.
- Then, we apply a background color to the body (AKA to the whole page) and add a bit of space around the edges with
margin. - Then, we select our canvas (which, if you recall, we gave an
idmeme-canvas) using#and set its width to 300px.- In CSS, when you select an element, like
h1, it will apply the styles you specify to allh1tags on the page. So if you were to add another heading, it would make it 30px and Impact font as well. However, in the case ofmeme-canvas, we're telling the CSS file to only select that specific canvas, so if we were to add another canvas at some point, it wouldn't apply that style to that canvas. - Why are we selecting that ID if we're not making another canvas? So that you can learn about selecting IDs! :)
- In CSS, when you select an element, like
That's it! This is all the CSS we'll be doing in the workshop.
3) JavaScript
You're doing great! Now, let's actually make our meme generator work with JavaScript.
Navigate to the script.js file and:
-
Make a
generateMeme()function which takes in parametersimg,topText,bottomText,topTextSize, andbottomTextSize:function generateMeme(img, topText, bottomText, topTextSize, bottomTextSize) { // Code here }Now, inside the
generateMeme()function:-
First, initialize a
Canvas, which will be pointing to ourmeme-canvaselement from our HTML code:const canvas = document.getElementById('meme-canvas');Here, we're doing something pretty cool: we're selecting the specific canvas that we wrote in the HTML file with ID
meme-canvas, and we're going to modify it right in our JavaScript code! -
Now, to get canvas' 2D rendering context, we'll call
getContext()by selecting out<canvas>element from HTML by its ID, and supplying'2d'as the argument. Our 2D rendering context will provide us with a lot of methods to stylize and draw on our canvas!const ctx = canvas.getContext('2d'); -
Next, we set the canvas' dimensions same as our meme image's dimensions:
canvas.width = img.width; canvas.height = img.height; -
Now, using our
2D rendering context, we clear out a rectangle, by erasing the pixels in a rectangular area by setting them to transparent black:ctx.clearRect(0, 0, canvas.width, canvas.height); -
After that, we draw the image on the canvas by using the
drawImage()function provided bycontextand supplying our image, and the X and Y coordinates.ctx.drawImage(img, 0, 0); // 0, 0 are our X and Y coordinates -
Next, we set the style of our text using three functions
ctx.fillStyle,ctx.strokeStyleandctx.textAlign:// Text style: white with black borders ctx.fillStyle = 'white'; ctx.strokeStyle = 'black'; ctx.textAlign = 'center'; -
Now, we set our
fontSize:let fontSize = canvas.width * topTextSize; //Font Size will change based on our input sliders ctx.font = `${fontSize}px Impact`; // We'll be using Impact font, which is used by most memes ctx.lineWidth = fontSize / 20; // lineWidth will be the outline of our text, and we're setting it to be 20th of our fontSize here. -
Next, to draw top text on our meme image, we use
ctx.fillTextto fill text andctx.strokeTextfor outlines:// Draw top text ctx.textBaseline = 'top'; // textBaseline property specifies the current text baseline used when drawing text. topText.split('\n').forEach((t, i) => { ctx.fillText(t, canvas.width / 2, i * fontSize, canvas.width); // fillText takes 3 arguments: first is our text, second and third arguments are our X and Y coordinates of the point at which to begin drawing the text. ctx.strokeText(t, canvas.width / 2, i * fontSize, canvas.width); // Arguments are same as fillText but strokeText draws outlines on our text. }); -
Now, we repeat the same steps for bottom text:
// Bottom text font size fontSize = canvas.width * bottomTextSize; ctx.font = `${fontSize}px Impact`; ctx.lineWidth = fontSize / 20; // Draw bottom text ctx.textBaseline = 'bottom'; bottomText.split('\n').reverse().forEach((t, i) => { // .reverse() because it's drawing the bottom text from the bottom up ctx.fillText(t, canvas.width / 2, canvas.height - i * fontSize, canvas.width); ctx.strokeText(t, canvas.width / 2, canvas.height - i * fontSize, canvas.width); }); } // End of our generateMeme() function
-
-
Now, after the
generateMeme()function, add a Window: DOMContentLoaded event listener which will listen forDOMContentLoadedevent.window.addEventListener('DOMContentLoaded', () => { //Code here });The code inside here will only be run after all of the elements on the page are loaded. We need this because we're about to select a bunch of elements on the HTML page, and if we didn't have it, it's possible that the code could try to select elements before they exist.
Inside the EventListener:
-
Initialize our
topTextInput,bottomTextInput,topTextSizeInput,bottomTextSizeInput,imageInputvariables usingdocument.getElementById()method:const topTextInput = document.getElementById('top-text'); const bottomTextInput = document.getElementById('bottom-text'); const topTextSizeInput = document.getElementById('top-text-size-input'); const bottomTextSizeInput = document.getElementById('bottom-text-size-input'); const imageInput = document.getElementById('image-input'); const generateBtn = document.getElementById('generate-btn'); -
Next, we give a default text (or value) for the
topTextInputandbottomTextInput:topTextInput.value = 'Top\nValue'; bottomTextInput.value = 'Bottom\nValue'; -
After that, add a
clickevent listener to thegenerateBtn. The code inside here will run every time that button is clicked.generateBtn.addEventListener('click', () => { // Code here }); -
Inside the
EventListener, we'll use the FileReader API to read the meme template from the filesystem as a DataURL:const reader = new FileReader(); reader.readAsDataURL(imageInput.files[0]) -
Now, after the FileReader finishes reading the meme template we want to generate a new
Image, and that image's source will be our reader's result. After our new image is loaded, we'll pass our new image, text and text sizes to thegenerateMeme()function where it'll be displayed on our canvas!reader.onload = () => { const img = new Image(); img.src = reader.result; img.onload = () => { generateMeme(img, topTextInput.value, bottomTextInput.value, topTextSizeInput.value, bottomTextSizeInput.value); }; };
-
Final JavaScript code:
function generateMeme(img, topText, bottomText, topTextSize, bottomTextSize) {
const canvas = document.getElementById('meme-canvas');
const ctx = canvas.getContext('2d');
// Size canvas to image
canvas.width = img.width;
canvas.height = img.height;
// Clear canvas
ctx.clearRect(0, 0, canvas.width, canvas.height);
// Draw main image
ctx.drawImage(img, 0, 0);
// Text style: white with black borders
ctx.fillStyle = 'white';
ctx.strokeStyle = 'black';
ctx.textAlign = 'center';
// Top text font size
let fontSize = canvas.width * topTextSize;
ctx.font = `${fontSize}px Impact`;
ctx.lineWidth = fontSize / 20;
// Draw top text
ctx.textBaseline = 'top';
topText.split('\n').forEach((t, i) => {
ctx.fillText(t, canvas.width / 2, i * fontSize, canvas.width);
ctx.strokeText(t, canvas.width / 2, i * fontSize, canvas.width);
});
// Bottom text font size
fontSize = canvas.width * bottomTextSize;
ctx.font = `${fontSize}px Impact`;
ctx.lineWidth = fontSize / 20;
// Draw bottom text
ctx.textBaseline = 'bottom';
bottomText.split('\n').reverse().forEach((t, i) => { // .reverse() because it's drawing the bottom text from the bottom up
ctx.fillText(t, canvas.width / 2, canvas.height - i * fontSize, canvas.width);
ctx.strokeText(t, canvas.width / 2, canvas.height - i * fontSize, canvas.width);
});
}
window.addEventListener('DOMContentLoaded', () => {
// Initialize variables
const topTextInput = document.getElementById('top-text');
const bottomTextInput = document.getElementById('bottom-text');
const topTextSizeInput = document.getElementById('top-text-size-input');
const bottomTextSizeInput = document.getElementById('bottom-text-size-input');
const imageInput = document.getElementById('image-input');
const generateBtn = document.getElementById('generate-btn');
// Default/Demo text
topTextInput.value = 'Top\nValue';
bottomTextInput.value = 'Bottom\nValue';
// Generate button click listener
generateBtn.addEventListener('click', () => {
// Read image as DataURL using the FileReader API
const reader = new FileReader();
reader.onload = () => {
  const img = new Image();
  img.src = reader.result;
  img.onload = () => {
    generateMeme(img, topTextInput.value, bottomTextInput.value, topTextSizeInput.value, bottomTextSizeInput.value);
  };
};
reader.readAsDataURL(imageInput.files[0]);
});
});
And with this, we've finished coding our Meme-Genie! Check out what you've just built by clicking the "Run" Button at the top.
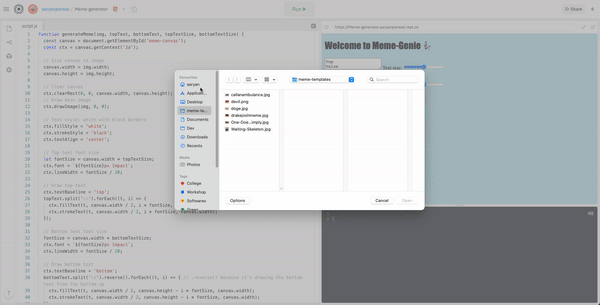
Note: To save the generated meme, you can right click the meme and click "save as..."
Part 4: Hacking
Now that we have finished building a very basic website, we can add a lot of cool things to it!
Here are some things you can try to add:
- Try to add colour picker, so that user can change topText/bottomText colour.
- Add a drag and drop feature, using the HTML5 Drag and Drop API.
- Make a Flexbox to create a nice layout.
- Use an API to fetch meme-templates, like the one provided by ImgFlip.
- Add Share and Download buttons, to share your super awesome meme!
Part 5: The End
If you haven't created an account on repl.it, make sure you do so to save this wonderful creation!
If you're having trouble signing up, ask your club leader or someone on the Hack Club Slack!
Some More Examples
What Other Hack Club Hackers Made
- Sam Poder used the Unsplash API to get an image based on the Bottom Text!
- Khushraj Rathod built a meme generator that uses the ImgFlip API to fetch random meme templates!
Part 6: Sharing with the Community
Now that you have finished building an awesome project, you should share it with your friends or with our world wide Hack Club Community!
In a new tab, open and follow these directions to sign up for our Slack. Then, post the link to the #ship channel to share it with everyone!
P.S I'm @Aaryan Porwal on Hack Club's Slack.