

Today, We'll be building a simple yet fun calculator in React.
Here's the source code.
Part 1: Prerequisites
You should know some basics of React and I recommend you to follow this workshop before proceeding further. If you're having trouble, feel free to ask me or anyone in the Hack Club Slack!
Part 2: Setup
For writing our code, we'll be using CodeSandbox which turns out to be the best online code editor for React.
To get started, go to this starter code. Press ctrl+s / cmd+s and it will automatically fork it for you. Now, we have everything set up so let's get started!
Part 3: Building the project
1) The Starter Code
Let's first have a look at our project's starter code.
First, there are 2 main directories and a package.json file. We'll ignore the package.json file for now and let's have a look at the 2 directories, namely, public/ and src/.
Usually, the public/ directory contains an HTML file and all your assets. We won't be touching the public/ directory during the whole workshop, not even the HTML file!
Next is the src/ directory which contains all your JavaScript files and your CSS files. We have an index.js file, which basically renders our React code. The styles.css file is already written for you.
Next is the App.js file. It looks something like this:
import React, { useState } from 'react'
import './styles.css'

const operatorsArr = ['*', '/', '+', '.', '-']

export default function App() {
  return (
    <div className="App">
      <h1>React Calculator</h1>
      <div className="calc-wrapper"></div>
    </div>
  )
}
Explanation: Here, useState is already imported for you as we'll be using it in the later part of the workshop. Next, there's an array containing all the basic operators. The App component simply renders a heading and a div with a className of calc-wrapper for now.
Next, if we look in the components/ directory, we have a Button component and a components.css file.
2) Creating the Button component.
Let us start building the Button component.
First we'll create a function isNum inside the component which checks if a value is a number or not.
const Button = () => {
  const isNum = (val) => {
    if (!isNaN(val) || val === 'C' || val === '.') {
      return true
    }
    return false
  }
}
Explanation: We create a function named isNum which takes in a val as an argument. Then it checks whether the val is a number or C (clear) or a decimal (.), if any of the condition is true, it returns true or else it simply returns false.
Next we'll create a function to check whether a value is an equal sign or not.
const Button = () => {
  // ...

  const isEqual = (val) => {
    if (val === '=') {
      return true
    }
    return false
  }
}
Explanation: This is a quite simple function which takes in a value as an argument and checks whether the value is an equal sign or not and returns true/false accordingly.
Now its time to render some jsx in this component. This is going to be a bit tricky and will make use of props. So try to concentrate and understand what we are writing and you'll surely not be confused.
There will be 3 main props we'll be using in this component.
children- This prop is the value which will be passed to the component's opening and closing tags.
Example:
<Button>7</Button> // Here, 7 is the children of that component.
-
onClick- This prop will simply store the functions which we'll create later for our calculator. This function will be passed to the Button component'sonClick. -
isInput- This prop will work as a boolean for us and help us to determine whether the component will render theinputstate's value or not.
NOTE: We haven't yet created the input state but we'll be doing it soon in few minutes.
const Button = ({ children, onClick, isInput }) => { // <-- Props
  const isNum = (val) => {...};
  const isEqual = (val) => {...};

  return (
    <>
      {isInput ? (
        <div className="input">{children}</div>
      ) : (
        <div
          className={`button-wrapper button ${isEqual(children) ?"equal-btn" : null} ${isNum(children) ? null : "operator"}`}
          onClick={() => onClick(children)}>
          {children}
        </div>
      )}
    </>
  );
};
Explanation: First we accepted the 3 props in this component. Now here comes the tricky part.
We use fragments as the parent element of the jsx. Fragments let you group a list of children without adding extra nodes to the DOM.
NOTE: <></> is known as fragments.
Then we have used ternary operators to render different div accordingly. If the isInput is true, it will render the div with the className of input or else it will render another div.
Notice that in the second div, we have again used ternary operators to determine that div's className. We call the isEqual function passing it the value of children and if it returns true, it will add a className of equal-btn to the div. We have also called the isNum function passing it the same value of children and if it returns true, it will add a classname of operator to the div.
Next we give an onClick attribute to the div which will simply call the onClick function which also takes in the children as an argument.
NOTE: The onClick function will be passed down by the parent component to this component.
And lastly, we simply render out the children of the component.
I hope I wasn't vague in explaining you what the code is doing. If you are still confused, try to read the code and understand it again. Or else, feel free to reach me out on slack!
By this, we finish our Button component and now its time to render it out in the main parent component (App) and also pass the appropriate props to it.
import React from "react";
import "./components.css";

const Button = ({ children, onClick, isInput }) => {
  const isNum = (val) => {
    if (!isNaN(val) || val === "C" || val === ".") {
      return true;
    }
    return false;
  };

  const isEqual = (val) => {
    if (val === "=") {
      return true;
    }
    return false;
  };

  return (
    <>
      {isInput ? (
        <div className="input">{children}</div>
      ) : (
        <div
          className={`button-wrapper button ${
            isEqual(children) ? "equal-btn" : null
          } ${isNum(children) ? null : "operator"}`}
          onClick={() => onClick(children)}
        >
          {children}
        </div>
      )}
    </>
  );
};

export default Button;
You've done great so far! And I recommend you to relax and take a 5 minutes break!

3) Creating the App component.
Let's render the Button component in our App component. We'll first import it in the App component and render a few Button components inside our calc-wrapper div.
import Button from "./components/Button";

export default function App() {
  return (
    <div className="App">
      <h1>React Calculator</h1>
      <div className="calc-wrapper">
        <Button isInput></Button>
        <div className="row">
          <Button>7</Button>
          <Button>8</Button>
          <Button>9</Button>
          <Button>/</Button>
        </div>
      </div>
    </div>
  )
}
Explanation: Inside the calc-wrapper, we first add a Button with a prop of isInput. This means that isInput will be true for this component and as we haven't passed the isInput prop to any other Button, it will be false for those components. Next, we create a row and add 4 Buttons to it, and as row has a property of flex, it will be displayed nicely on the browser as a row! We also passed the numbers 7, 8, 9 and the operator / as children to those buttons respectively.
Your preview should look something like this:
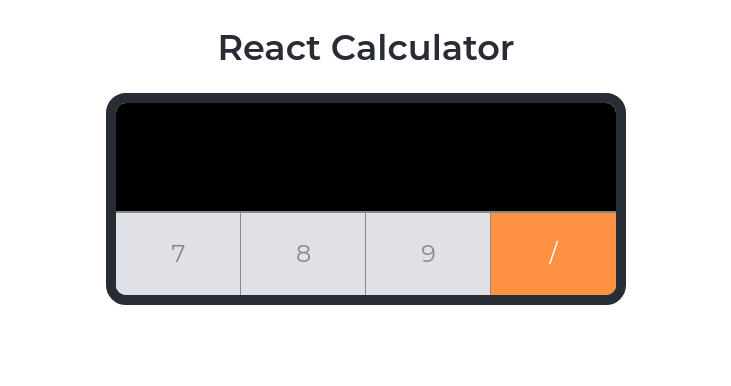
Excellent! Wondering how they got different colors even if they were the same component? This is why we created the functions isNum() and isEqual(). They check what the value of the children is and give the className accordingly! Isn't it cool?
Also wondering how the first Button component looks different than the others? This is because the isInput boolean prop is true for that component and the way we have built our Button component is it checks whether the isInput is truthy and displays a different div accordingly!
We just created the 4 buttons of our calculator!
Challenge: Can you try to add the rest of the buttons in a similar manner?
Hints:
-
Use rows for each group of buttons.
-
Check how the final output looks like and try to implement exactly like that!
export default function App() {

  return (
    <div className="App">
      <h1>React Calculator</h1>
      <div className="calc-wrapper">
        <Button isInput></Button>
        <div className="row">
          <Button>7</Button>
          <Button>8</Button>
          <Button>9</Button>
          <Button>/</Button>
        </div>
        <div className="row">
          <Button>4</Button>
          <Button>5</Button>
          <Button>6</Button>
          <Button>*</Button>
        </div>
        <div className="row">
          <Button>1</Button>
          <Button>2</Button>
          <Button>3</Button>
          <Button>+</Button>
        </div>
        <div className="row">
          <Button>.</Button>
          <Button>0</Button>
          <Button>C</Button>
          <Button>-</Button>
        </div>
        <div className="row">
          <Button>=</Button>
        </div>
      </div>
    </div>
  );
}
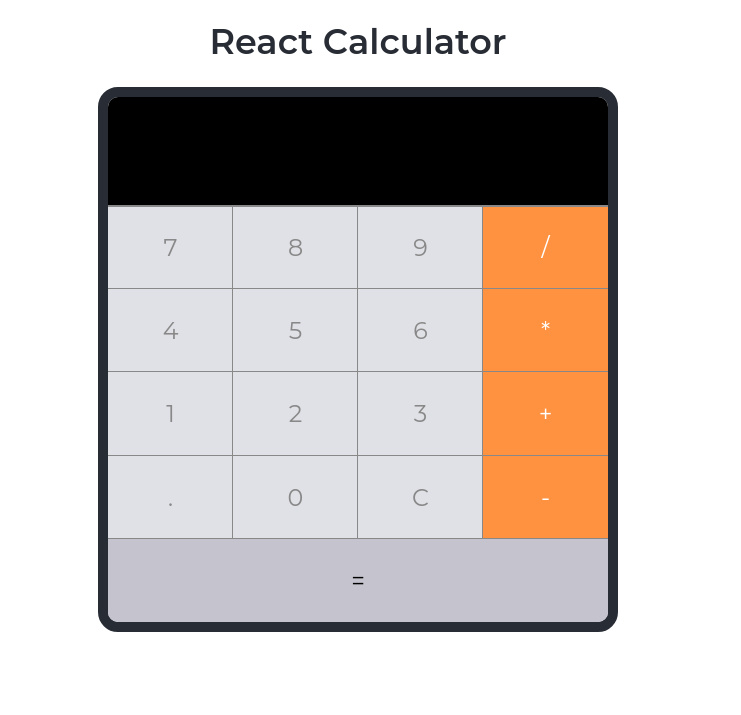
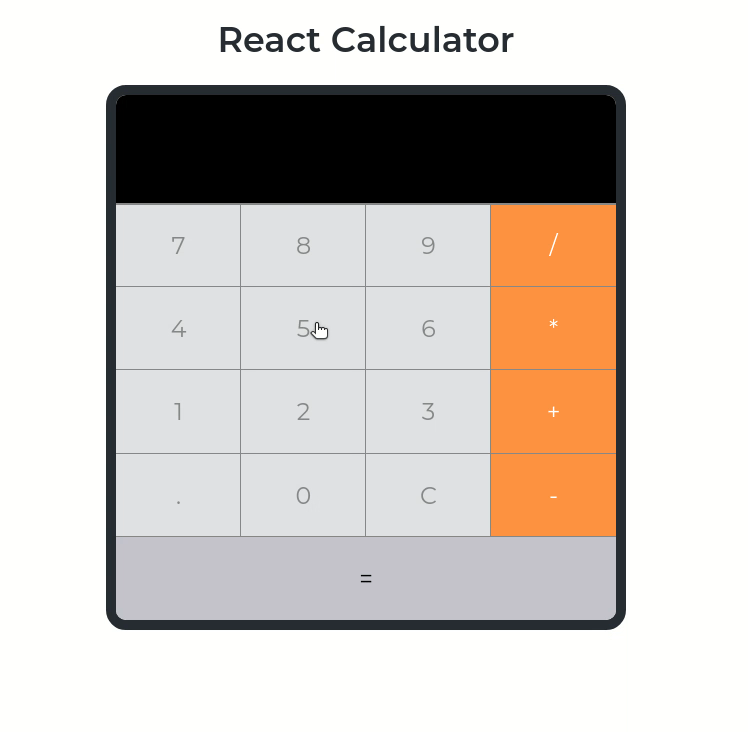
Now your preview window should look something like this!
You might have understood that we have finally completed our calculator's UI! Now all that remains is to make appropriate functions for our calculator to work as well as pass appropriate props to the Buttons!

4) Creating The Functions For Our Calculator.
Let us first create an input state which will store all the buttons pressed by the user and also help us in displaying the calculations.
export default function App() {
  const [input, setInput] = useState(""); // Creating the state

  // ...
}
Next, let's create a function which will store the numbers clicked by the user in the input state.
NOTE: We'll create seperate functions for operators and numbers as we don't want the ability to press the operators more than once simultaneously but the numbers can be pressed any number of times we want. If you are confused, don't worry! You'll get it in a minute.
export default function App() {
  const [input, setInput] = useState("");

  function inputNum(val) {
    setInput(input + val);
  }

  // ...
}
Explanation: We create a function inputNum which will take val as an argument. Then, we simply append it to the current stored value in the input.
Now, we'll make a similar but tricky function for operators. Don't worry, It'll be a little confusing if you look at it the first time.
function inputNum(val) {...}

function inputOperator(val) {
  if (input === "" || (operatorsArr.includes(input[input.length - 1]) && operatorsArr.includes(val))
  ) {
    return;
  } else {
    setInput(input + val);
  }
}

  // ...
Explanation: We first create a function inputOperator which also takes in a val as an argument. Then, we make use of if-else statements to check certain conditions.
First, it checks whether the input is empty or not. (We definitely don't want the user to click on the operator if there's no number present in the input). If this condition is not true, then it moves ahead to the next condition.
input[input.length - 1] means the last value of the input string. Suppose input is 12%2*, then the last value here is *, therefore input[input.length - 1] here is equal to *. Also, operatorsArr.includes() is a function which checks whether a certain value is in an array or not.
So we basically check whether the operatorsArr includes the last value of the input or not. If this condition is true, it again moves to the next condition which checks whether the val argument is included in the operatorsArr or not.
What does this mean? In simple language, it simply checks if the previously pressed value by the user is an operator or not while also checking if the newly pressed value (val) is again, an operator or not. This will mean that the user pressed the operators 2 times simultaneously. Thus, it will be prevented.
If the first condition is true alone, the function will simply return nothing. Also if the second and the third condition both are true, it will do the same.
If all the conditions turn out to be false, finally it will update the input state with the val.
Woah that was a pretty big brain! I hope you understood what and why we wrote this code.

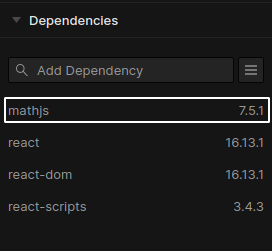
Now, we'll make use of the library mathjs which, if you look in the project dependencies, it is already installed for you. We only need to import it in our project and the functions in it will be ready to use.
Next, on line 4 of App.js we'll import it.
import * as math from "mathjs";
Now, every function inside that library is stored in math.
Next, we'll create a function to evaluate our calculations.
function inputOperator(val) {...}

function evaluate() {
  if (input === "" || operatorsArr.includes(input[input.length - 1])) {
    return input;
  } else {
    setInput(math.evaluate(input));
  }
}
Explanation: This function checks if the input is empty or if the last value of the input is an operator. If these conditions are true, this will mean that the input can't be evaluated. So, it will simply return the input. If everything's perfect and the conditions turn out to be false, it will make use of the evaluate() function in the mathjs library and simply evaluate the input!
And here we complete all the necessary functions for the calculator to work!
The last thing which is remaining is passing the appropriate props to the Button components which will complete our project!
5) Passing The Appropriate props To The Button Components.
For the very first Button component, we have passed the isInput prop to it, we'll also pass input as the children to that component.
return (
  <div className="App">
    <h1>React Calculator</h1>
    <div className="calc-wrapper">
      <Button isInput>{input}</Button>
      {/* ... */}
    </div>
  </div>
)
Next, for each Button which has a number as their children, we'll pass onClick={inputNum} prop to it. And for each Button which has an operator as their children (including the decimal .) we'll pass onClick={inputOperator} prop to it.
For the button which has '=' as its children, we'll pass onClick={evaluate} prop to it.
Lastly, for the Button which has 'C' (clear) as its children, we'll pass onClick and also create an inline function which will simply clear the state.
After passing all the props, here's what it should look like:
return (
  <div className="App">
    <h1>React Calculator</h1>
    <div className="calc-wrapper">
      <Button isInput>{input}</Button>
      <div className="row">
        <Button onClick={inputNum}>7</Button>
        <Button onClick={inputNum}>8</Button>
        <Button onClick={inputNum}>9</Button>
        <Button onClick={inputOperator}>/</Button>
      </div>
      <div className="row">
        <Button onClick={inputNum}>4</Button>
        <Button onClick={inputNum}>5</Button>
        <Button onClick={inputNum}>6</Button>
        <Button onClick={inputOperator}>*</Button>
      </div>
      <div className="row">
        <Button onClick={inputNum}>1</Button>
        <Button onClick={inputNum}>2</Button>
        <Button onClick={inputNum}>3</Button>
        <Button onClick={inputOperator}>+</Button>
      </div>
      <div className="row">
        <Button onClick={inputOperator}>.</Button>
        <Button onClick={inputNum}>0</Button>
        <Button onClick={() => setInput("")}>C</Button>
        <Button onClick={inputOperator}>-</Button>
      </div>
      <div className="row">
        <Button onClick={evaluate}>=</Button>
      </div>
    </div>
  </div>
);
With this, we finish building our calculator! It also works as we expected it to.
Part 4: The End
You should be proud of yourself that you built this wonderful calculator!

Make sure you create an account on CodeSandbox to save this wonderful piece of creation or you'll loose it 😧.
Now it is up to you! Do crazy things with this project!
Here are some tasks for you:
-
Add more buttons to the calculator such as square, square root etc.
Example. -
Add keyboard support to your calculator!
Example.
Also checkout these cool examples!
Check out what other Hack Clubbers built!
Now that you have finished building it, you should share your beautiful creation with other people! (I can't wait to see you ship this!)
You probably know the best ways to get in touch with your friends and family, but if you want to share your project with the worldwide Hack Club community there is no better place to do that than on Slack.
1. In a new tab, open and follow these directions to signup for our Slack.
2. Then, post the link to the #ship channel to share it with everyone and also ping me!
PS. I'm @fayd on slack.