

Today, most of us use tons of messaging apps. Whether it's Slack, Whatsapp, Telegram, Hangouts, Discord, Facebook, Instagram, Messenger, Snapchat, Signal, Twitter, or iMessage, different friend circles will use different apps.
What if we create our own chat?!
Today, we'll be creating a web chat using WebSockets and Deno (If you've previously used Node.js, check out this talk on Deno)
Here's the final code and live demo.
If you get stuck anywhere in this workshop, feel free to ask me questions! I'm @KhushrajRathod on the Hack Club Slack.
Prerequisites
You must either:
- Know the basics of Javascript, HTML, and CSS
OR - Know how to Google
OR - Be willing to learn how to Google (This is not a joke, learning how to use google to get what you want fast is essential while coding. Check out this workshop to make a personal website and level up your google-fu!)
Part 1: Preparing your environment
Preparing repl.it
Today we'll be using repl.it. Repl.it is an online code editor that we can use so we don't have to download a lot of stuff or resort to Notepad/TextEdit. Think of it as Google Docs, but for code (and also much more fun :D).
Follow these steps:
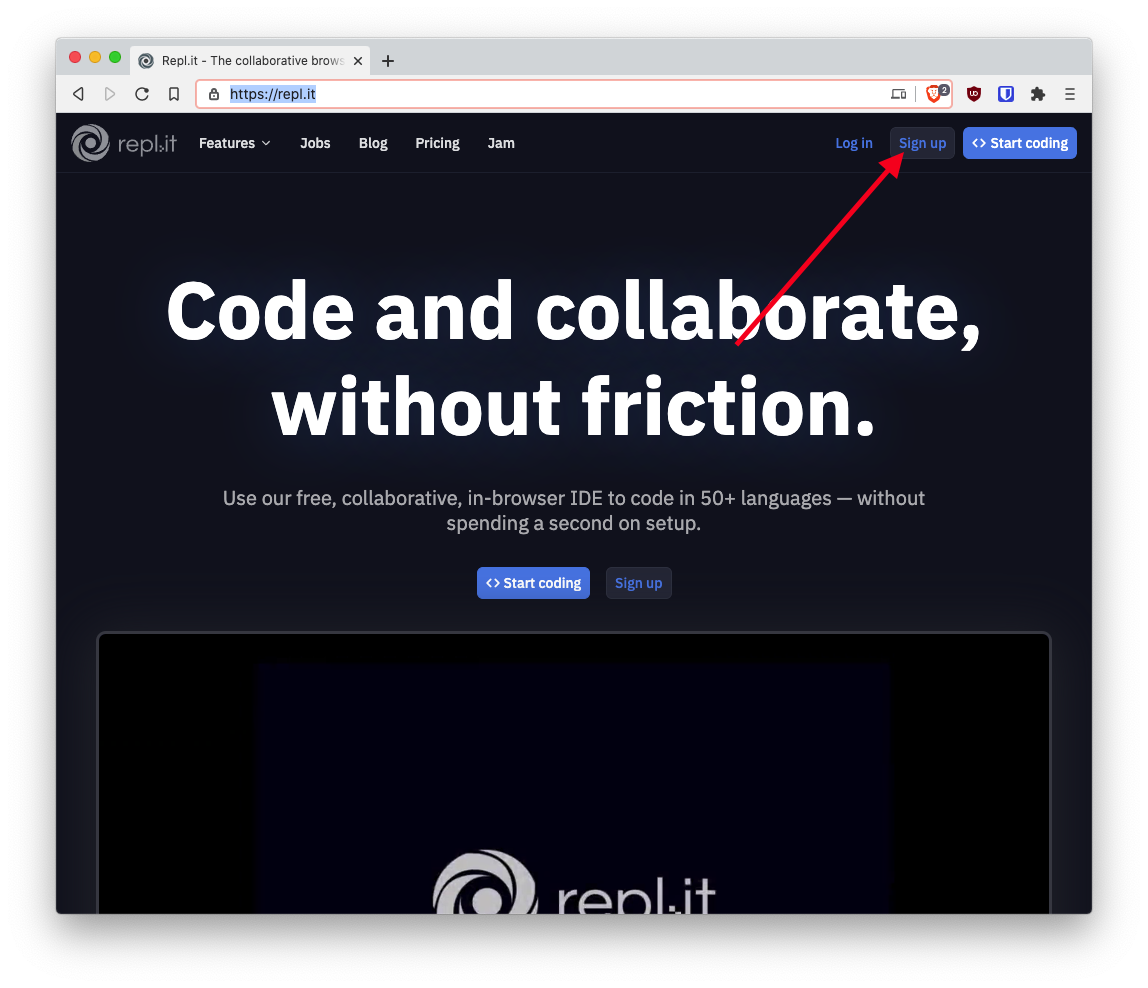
- Open https://repl.it/
- Click "Sign up"
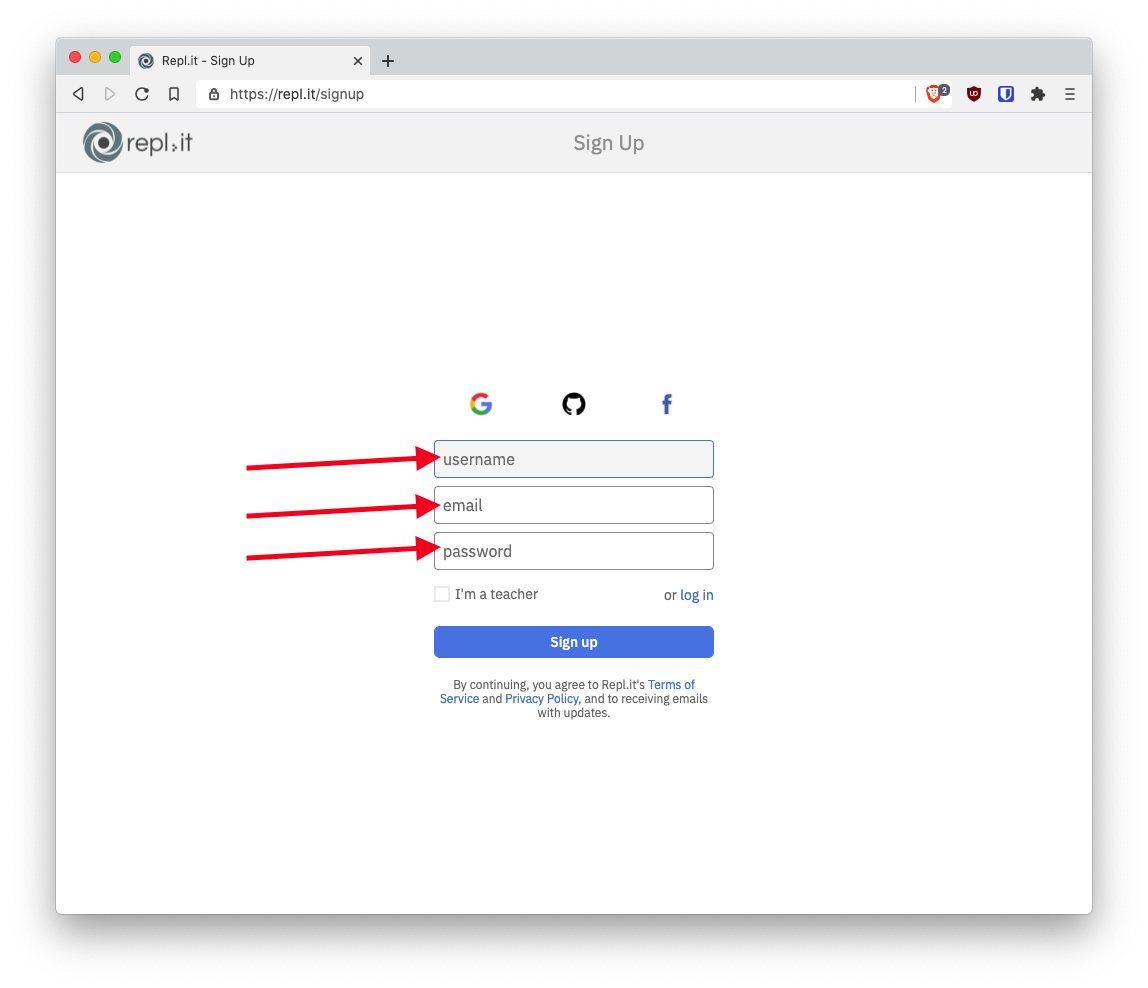
- Fill in some details
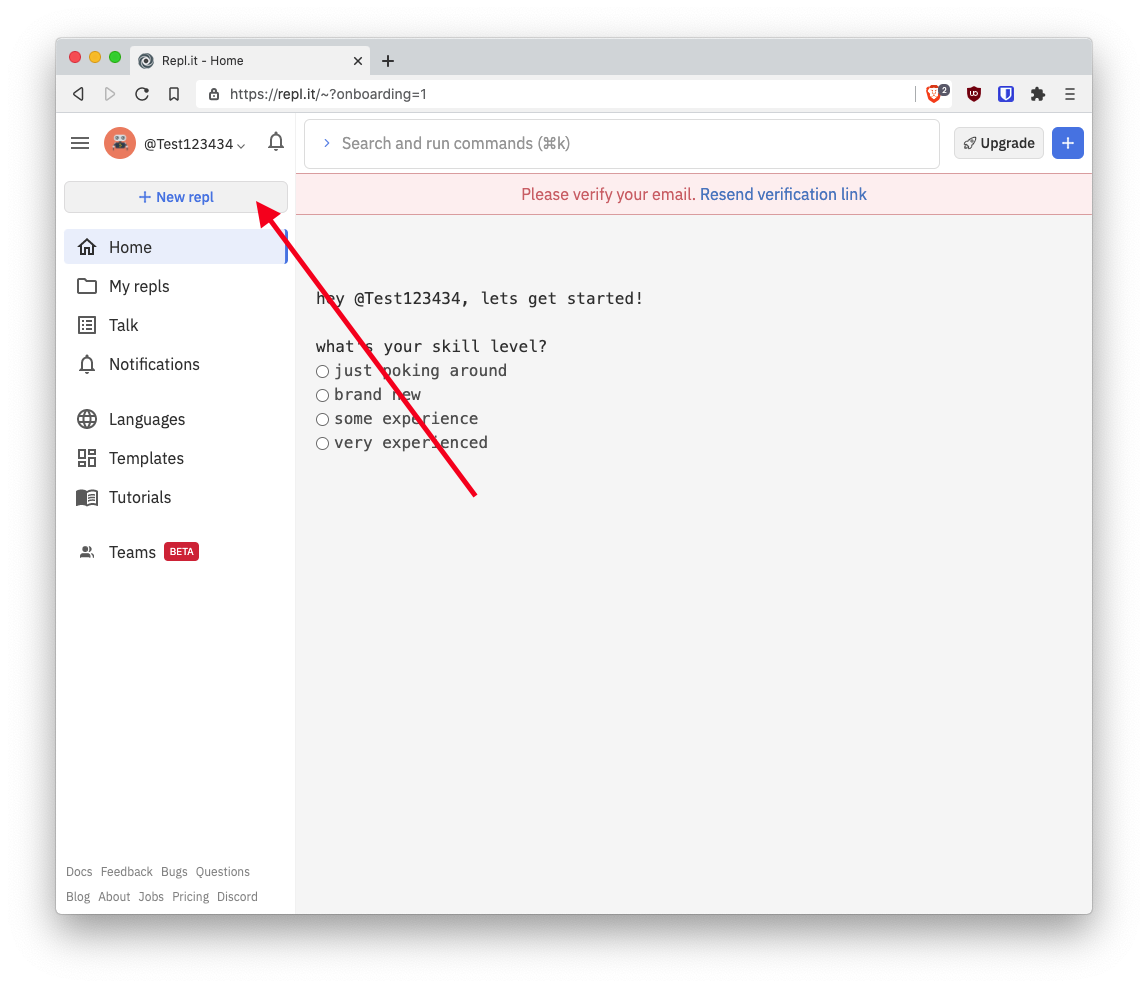
- You now have a Repl.it account! Next, click "New repl"
- Search for "Deno" in the search box, click "Deno" and click "Create repl".
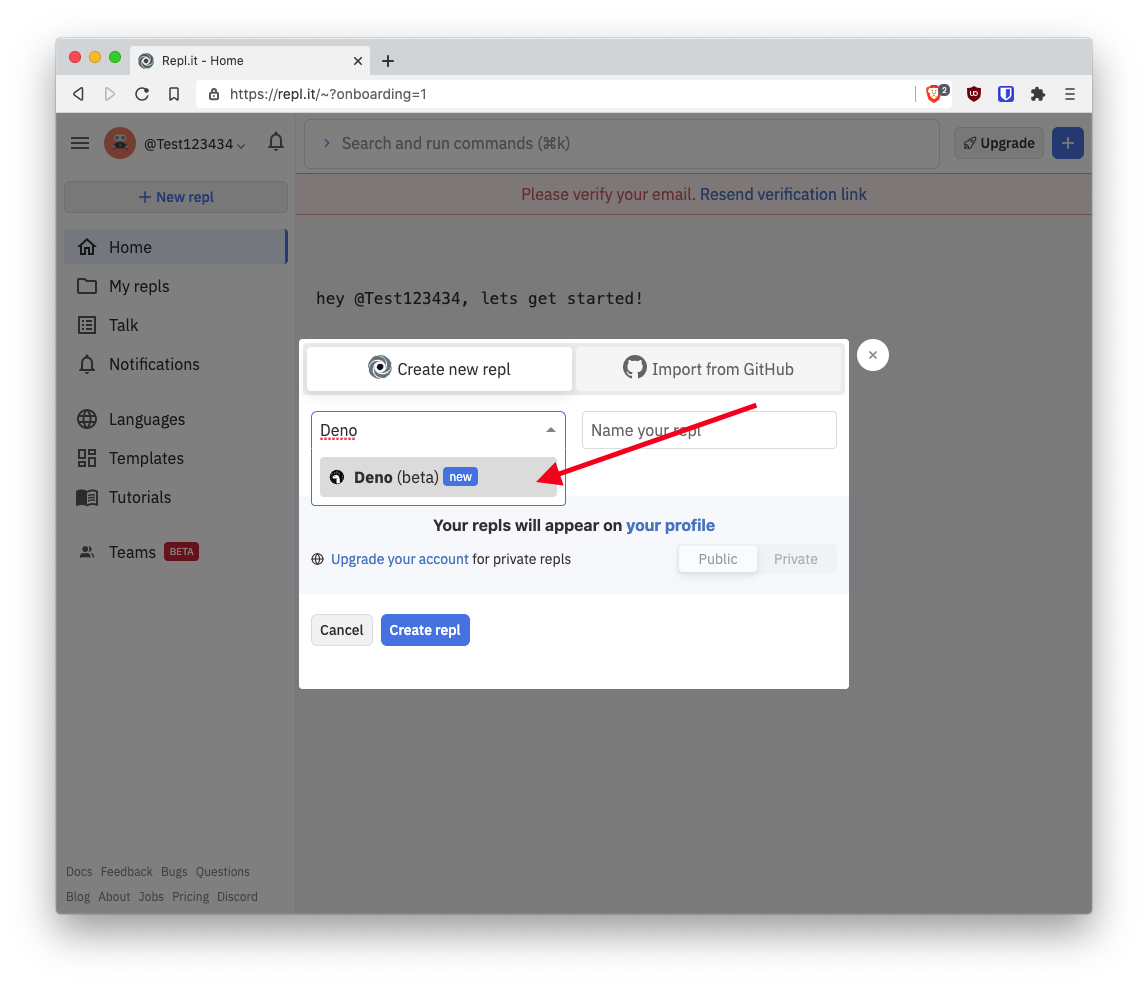
- You now have a Deno repl setup successfully.
Repl.it basics
- To add a file, click "Add file" in the top left and give it a name
- To write code, simply start typing in the code editor in the center of the screen
- To run code, click Run and refresh your page preview
- To format your code, click "auto-format" in the top-center of the screen
- To reload your page preview, click "Refresh" in the top-center of the screen
- Now, create a new file called
index.html. This is what everyone will see when they visit your website.
You just finished Part 1!!

Part 2: Preparing your website
Thinking about the website layout
The first step to making any UI is to think about how it'll look. Get some paper to start prototyping (or open your digital image editor if you're into that)
- First, we'll need a huge square to contain everything - This is our webpage body

- We'll need two rectangles, one large and one small - The large one will contain the messages sent and received (the message log) and the smaller one will contain controls and a space to type your message.
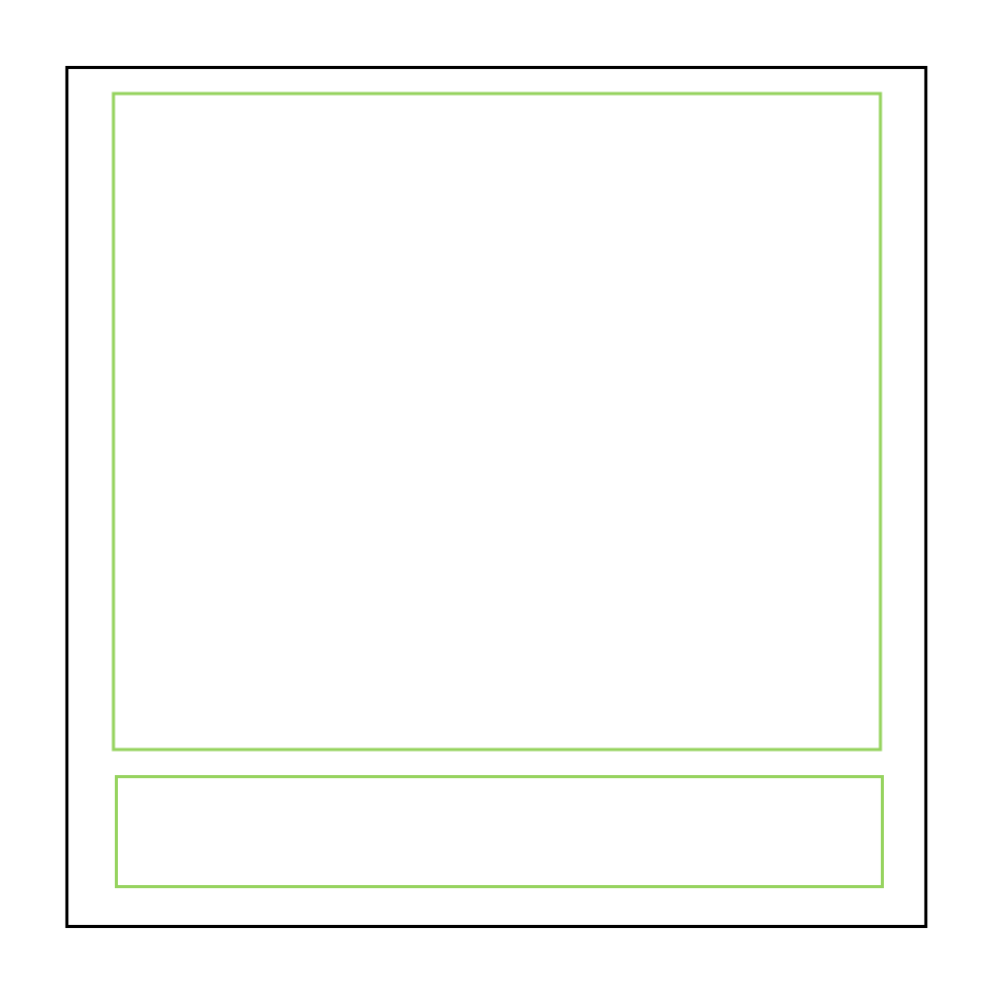
- Inside our smaller rectangle, we'll need 3 things
- A field to type the user's name
- A field to type their message
- A button so they can send their message

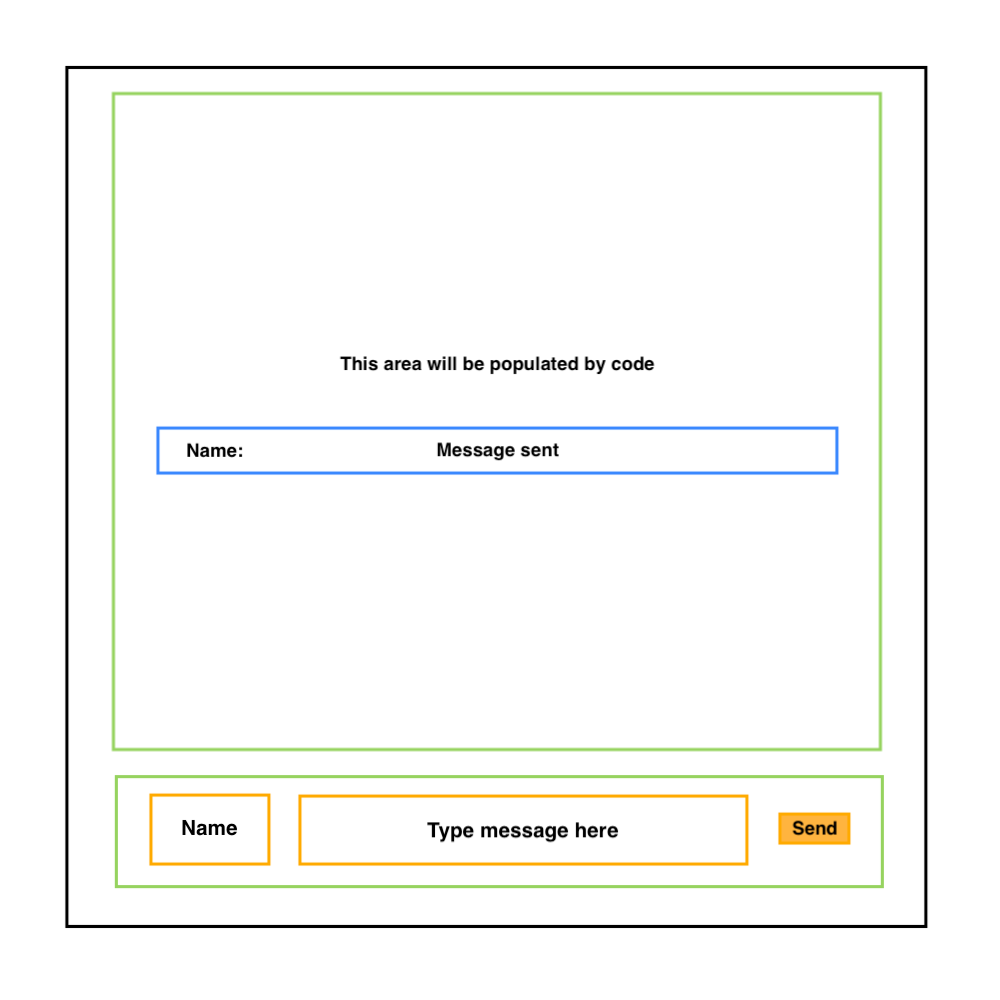
- We won't add stuff to the larger rectangle right now -- that'll happen when someone sends a message. Here's how a message will look
Adding the HTML
The HTML is the structure of the webpage. We won't be going into too much detail in this section -- to learn more about HTML and CSS, check out this workshop on making your first website. Add the following code to your HTML file
<!DOCTYPE html>
<html>

<head></head>

<body>
    <div id="messageLog"></div>
    <div id="controls">
        <input id="name" placeholder="Your name">
        <textarea id="message" placeholder="Type your message here"></textarea>
        <button id="send">
            Send
        </button>
    </div>
</body>

</html>
I'll quickly explain this code:
- The biggest rectangle that contains all other rectangles we spoke about is the
<body>tag- The message log (Large rectangle present on top) is
<div id="messageLog"></div> - The controls (Small rectangle below) is
<div id="controls">- The
<input>is for the user to input their name - The
<textarea>(a multi-line<input>) is for the user to type their message - The
<button>will allow the user to send their message
- The
- The message log (Large rectangle present on top) is
Adding the CSS
- Create a new file called
styles.css- CSS contained in this file will style our web page - Add a
<link rel="stylesheet" href="styles.css"/>inside<head></head>
<!DOCTYPE html>
<html>

<head>
    <link rel="stylesheet" href="styles.css" />
</head>

<body>
    <div id="messageLog"></div>
    <div id="controls">
        <input id="name" placeholder="Your name">
        <textarea id="message" placeholder="Type your message here"></textarea>
        <button id="send">
            Send
        </button>
    </div>
</body>

</html>
- Add the following CSS to the
styles.cssfile
* {
    box-sizing: border-box;
    font-family: sans-serif;
    padding: 5px;
    margin: 0px;
    border: 0px;
}

b {
    padding: 0px;
}

body,
html {
    width: 100%;
    height: 100%;
}

#messageLog {
    width: 100%;
    height: 90%;
    overflow: auto;
}

#controls {
    width: 100%;
    height: 10%;
    display: grid;
    grid-template-columns: 2fr 7fr 1fr;
    grid-gap: 10px;
}

#name {
    height: 100%;
    width: 100%;
    border: 1px solid gray;
    border-radius: 5px;
    text-align: center;
    word-wrap: break-word;
}

#message {
    height: 100%;
    width: 100%;
    border: 1px solid gray;
    border-radius: 5px;
}

#send {
    height: 100%;
    width: 100%;
    border-radius: 5px;
}
Explanation:
- Here, we're adding CSS to make our HTML look like our prototype
<body>is made to take up the full page- The message box takes up 90% of body's height
- The controls take up 10% of body's height
<div id="controls">is a grid, where- 2/10 of the space is taken up by the name
- 7/10 of the space is taken up by the message box
- 1/10 of the space is taken up by the button
Adding Javascript
- Create a new file called
frontend.js- This will be the code that runs on someone's device when they visit your webpage - Add a
<script src="frontend.js"></script>just before body ends
This is how the `index.html` file should look now:
<!DOCTYPE html>
<html>

<head>
    <link rel="stylesheet" href="styles.css" />
</head>

<body>
    <div id="messageLog"></div>
    <div id="controls">
        <input id="name" placeholder="Your name">
        <textarea id="message" placeholder="Type your message here"></textarea>
        <button id="send">
            Send
        </button>
    </div>
    <script src="frontend.js"></script>
</body>

</html>
Congratulations on making it so far!

Programming the server (and frontend Javascript)
As (at the time of writing) Deno is still in beta @repl.it, you'll want to ignore any errors regarding import, await, and the Deno object.
Let's get started with the server!
- Head over to the
index.tsfile and input the following code
import { serve } from "https://deno.land/std@0.75.0/http/server.ts"

const server = serve(":8080")
console.log(`Chat server is running on 8080`)

for await (const req of server) {
    await req.respond({ status: 200, body: "Server test" })
}
Explanation:
- We're creating a http server here so we can serve files and text
- The
for awaitloop replies to every request (i.e. everytime someone navigates to the server) that is sent to the server
Hit "Run" and you should see "Server test" in the top right of your screen. Next, let's actually serve the frontend we made.
import { serve } from "https://deno.land/std@0.75.0/http/server.ts"

const server = serve(":8080")
console.log(`Chat server is running on 8080`)

for await (const req of server) {
    try {
        let headers = new Headers()
        let data

        if (req.url === "/" || req.url === "/index.html") {
            headers.set("Content-Type", "text/html")
            data = await Deno.readTextFile("index.html")
        } else if (req.url === "/styles.css") {
            headers.set("Content-Type", "text/css")
            data = await Deno.readTextFile("styles.css")
        } else if (req.url === "/frontend.js") {
            headers.set("Content-Type", "text/javascript")
            data = await Deno.readTextFile("frontend.js")
        } else {
            throw 404
        }

        await req.respond({ status: 200, body: data, headers: headers })
    } catch {
        await req.respond({ status: 404 })
    }
}
Here's what's happening here:
- By default, all requests go to "/", and we want to serve the index.html when the request goes to "/"
- We read the requested file and set the Content-Type headers so the browser knows what to do with the file (i.e. Run the javascript and use the css to style the HTML)
- If that file does not exist, we send a 404 error.
You should see the UI created earlier. Let's create a websocket that a webpage can connect to:
import { serve } from "https://deno.land/std@0.75.0/http/server.ts"
import { acceptWebSocket, WebSocket } from "https://deno.land/std@0.75.0/ws/mod.ts"

const server = serve(":8080")
console.log(`Chat server is running on 8080`)

for await (const req of server) {
    try {
        const { conn, r: bufReader, w: bufWriter, headers } = req
        let socket = await acceptWebSocket({
            conn,
            bufReader,
            bufWriter,
            headers,
        })
    } catch (error) {
        try {
            let headers = new Headers()
            let data

            if (req.url === "/" || req.url === "/index.html") {
                headers.set("Content-Type", "text/html")
                data = await Deno.readTextFile("index.html")
            } else if (req.url === "/styles.css") {
                headers.set("Content-Type", "text/css")
                data = await Deno.readTextFile("styles.css")
            } else if (req.url === "/frontend.js") {
                headers.set("Content-Type", "text/javascript")
                data = await Deno.readTextFile("frontend.js")
            } else {
                throw 404
            }

            await req.respond({ status: 200, body: data, headers: headers })
        } catch {
            await req.respond({ status: 404 })
        }
    }
}
Every time someone vists our page, we'll want to send index.html to them. However, trying to connect to a websocket also counts as a request. For every request that we get, we want to try to parse it as a websocket request. If that fails, then we send the requested file according to the URL. If you hit "Run" now, you should see... no changes. This is because we haven't added any code to connect to our websocket in the frontend yet!
Add the following code to frontend.js:
let ws

document.addEventListener("DOMContentLoaded", _ => {
    ws = new WebSocket(`wss://${window.location.host}`)
    ws.onopen = function (event) {
        console.log("Socket connection is open")
        ws.send(JSON.stringify({
            type: "open",
            data: {}
        }))
    }

    ws.onmessage = function (event) {
        console.log("Message received")
        const msg = JSON.parse(event.data)
        console.log(msg.data)
    }
})
If you try to run the code you should see... no changes (again 😑). The socket connects to the server but the server doesn't do anything. Add the following code just before } catch (error) { in index.ts:
try {
    handleWs(socket)
} catch (err) {
    console.error(`failed to receive frame: ${err}`)
    if (!socket.isClosed) {
        await socket.close(1000).catch(console.error)
    }
}
At the end of index.ts, add:
async function handleWs(socket: WebSocket) {
    for await (const event of socket) {
        if (typeof event === "string") {
            const parsedEvent = JSON.parse(event)
            if (parsedEvent.type === "open") {
                console.log("Connection established with a client.")
            }
        }
    }
}
Explanation:
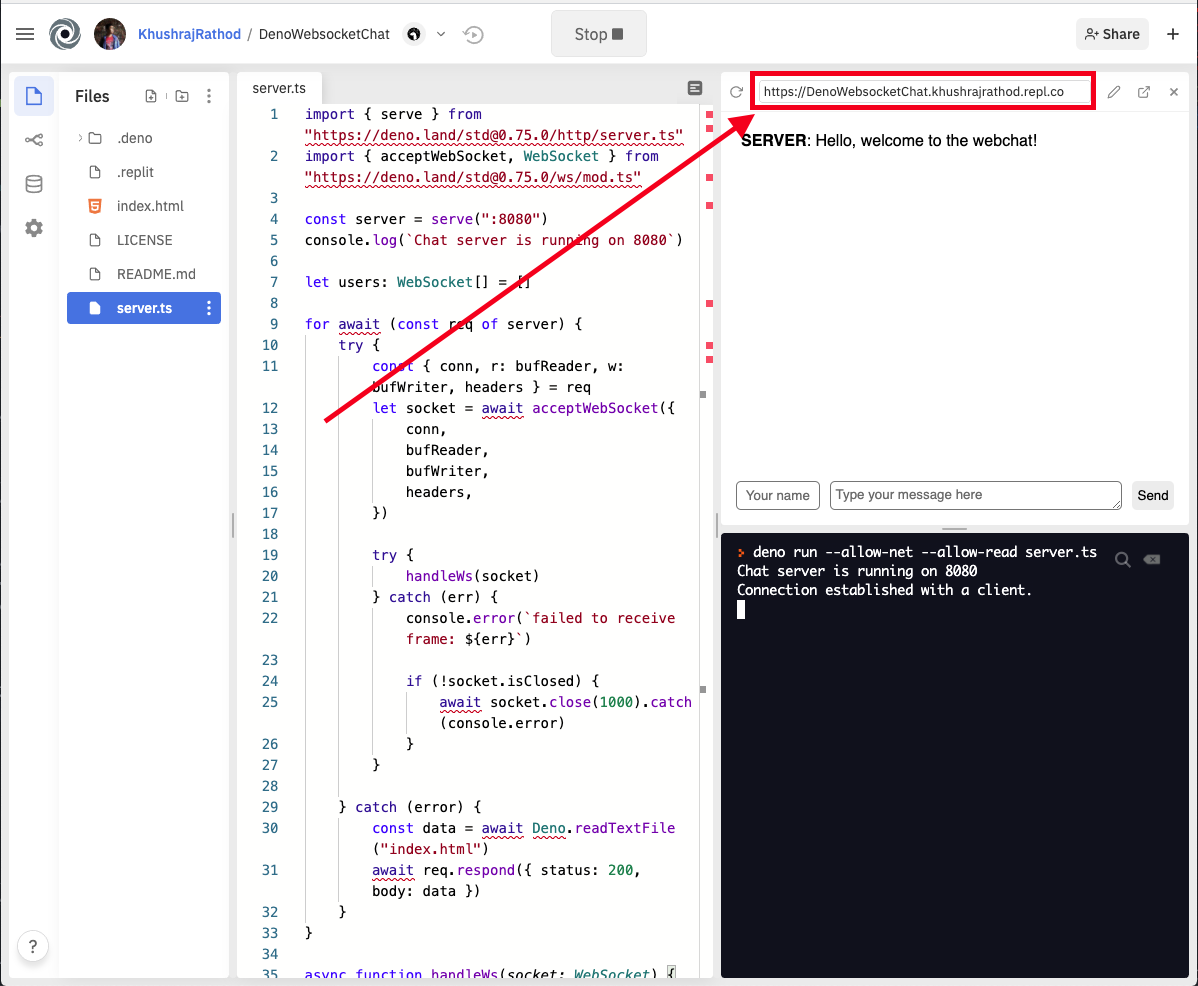
(from above) Every time someone connects to our websocket, we want to try to handle the websocket, i.e. we want to do something for every request to the websocket. If an error is present, we log the error and close the connection. Here, we're listening for an event of type "open" (which we're sending from index.html). If you try running your code now, you should see "Connection established with a client." in your console 🎉🎉
Next, let's store connections to users and send a welcome message to them. We'll create a new array, i.e. a list (add below console.log(`Chat server is running on 8080`)):
let users: WebSocket[] = []
Everytime a user connects to the websocket, we want to store the connection in the array. Add this below console.log("Connection established with a client."):
users.push(socket)
We also want to send them a message when they connect (add below users.push(socket)):
await socket.send(JSON.stringify({
    type: "message",
    data: {
        name: "SERVER",
        message: "Hello, welcome to the webchat!"
    }
}))
This is how your `index.ts` file should look now:
import { serve } from "https://deno.land/std@0.75.0/http/server.ts"
import { acceptWebSocket, WebSocket } from "https://deno.land/std@0.75.0/ws/mod.ts"

const server = serve(":8080")
console.log(`Chat server is running on 8080`)

let users: WebSocket[] = []

for await (const req of server) {
    try {
        const { conn, r: bufReader, w: bufWriter, headers } = req
        let socket = await acceptWebSocket({
            conn,
            bufReader,
            bufWriter,
            headers,
        })

        try {
            handleWs(socket)
        } catch (err) {
            console.error(`failed to receive frame: ${err}`)

            if (!socket.isClosed) {
                await socket.close(1000).catch(console.error)
            }
        }

    } catch (error) {
        try {
            let headers = new Headers()
            let data

            if (req.url === "/" || req.url === "/index.html") {
                headers.set("Content-Type", "text/html")
                data = await Deno.readTextFile("index.html")
            } else if (req.url === "/styles.css") {
                headers.set("Content-Type", "text/css")
                data = await Deno.readTextFile("styles.css")
            } else if (req.url === "/frontend.js") {
                headers.set("Content-Type", "text/javascript")
                data = await Deno.readTextFile("frontend.js")
            } else {
                throw 404
            }

            await req.respond({ status: 200, body: data, headers: headers })
        } catch {
            await req.respond({ status: 404 })
        }
    }
}

async function handleWs(socket: WebSocket) {
    for await (const event of socket) {
        if (typeof event === "string") {
            const parsedEvent = JSON.parse(event)
            if (parsedEvent.type === "open") {
                console.log("Connection established with a client.")
                users.push(socket)

                await socket.send(JSON.stringify({
                    type: "message",
                    data: {
                        name: "SERVER",
                        message: "Hello, welcome to the webchat!"
                    }
                }))
            }
        }
    }
}
We need references to the current message and name of the user in frontend.js. Add the following just after document.addEventListener("DOMContentLoaded", _ => {:
const name = document.getElementById("name")
const message = document.getElementById("message")
After the ws.onmessage block in frontend.js, add a function to add messages received to the screen:
function addMessages(message) {
    document.getElementById("messageLog").insertAdjacentHTML(
        'beforeend',
        `<p><b>${message.name}</b>: ${message.message}</p>`
    )
}
Below the last line inside ws.onmessage, add:
addMessages(msg.data)
Here's how `frontend.js` should look now
let ws

document.addEventListener("DOMContentLoaded", _ => {
    ws = new WebSocket(`wss://${window.location.host}`)

    const name = document.getElementById("name")
    const message = document.getElementById("message")

    ws.onopen = function (event) {
        console.log("Socket connection is open")
        ws.send(JSON.stringify({ type: "open", data: {} }))
    }

    ws.onmessage = function (event) {
        console.log("Message received")
        const msg = JSON.parse(event.data)
        console.log(msg.data)
        addMessages(msg.data)
    }

    function addMessages(message) {
        document.getElementById("messageLog").insertAdjacentHTML(
            'beforeend',
            `<p><b>${message.name}</b>: ${message.message}</p>`
        )
    }
})
If you hit run now, you should see "SERVER: Hello, welcome to the webchat!".
Great! But there's still one important feature to go: You can't send messages yet. In frontend.js, add a new function called sendMessage:
function sendMessage() {
    if (name.value.trim() === "") {
        alert("Please enter your name")
    } else if (message.value.trim() === "") {
        alert("Please enter your message")
    } else {
        ws.send(JSON.stringify({
            type: "message",
            data: {
                name: name.value,
                message: message.value
            }
        }))
        message.value = ""
    }
}
Explanation:
- First we're making sure the user entered their name and message, i.e. their message is not empty or just spaces
- If both are not empty, then we send the message to the server.
- After sending the message, we clear the message textarea's value so the user can send their next message without having to remove the message manually -- Note that we don't clear the name.
We want to call this function when the user either
- Clicks on the send button
- Presses enter on the keyboard
Add the following below ws.onmessage:
document.getElementById("send").addEventListener("click", sendMessage)
message.addEventListener("keypress", function (event) {
    console.log(event)
    if (event.key === "Enter") {
        sendMessage()
    }
})
Next, we'll add some code to the server so that for each message it receives, it'll send it to all users present.
After
if (parsedEvent.type === "open") {
  // ...
}
add the following:
else if (parsedEvent.type === "message") {
    console.dir(parsedEvent)
    users = users.filter(user => {
        try {
            user.send(JSON.stringify(parsedEvent))
            return true
        } catch { // User closed connection
            return false
        }
    })
    console.log(`There ${users.length === 1 ? "is" : "are"} ${users.length} ${users.length === 1 ? "user" : "users"} online`)
}
Here's what users.filter() does:
- For every user (we stored the connection to each user in the array users, remember?), it will run some code.
- Depending on what that code returns (either true or false), it will choose whether to keep the user in the list of users or to remove it
Here, we try to send the message received to every user. If the message cannot be sent (i.e. If the user closed the tab/window), then we return false which removes the user from the list of users.
Try running the code and sending the message. You should see your message show up in the chat.
WE'VE DONE IT! Now let's test the app.
Open this URL in multiple tabs:
Enter different names on separate tabs and send messages as if you're having a conversation.
CONGRATULATIONS ON MAKING IT! YOU'VE SUCCESSFULLY MADE A WEB CHAT.
Except... Let's actually test the application. Send the URL from above to some friends and then PARTY!

What's next?
We've managed to build a basic web chat, now let's build upon it and MAKE IT EXTREMELY USEFUL! This is for you to hack on, but here's some inspiration:
-
Web chat with server response automation In this web chat, entering some messages will trigger responses from the server - Try "Hello", "Hi", "Bye", or "Creeper"
-
Web chat but clients spam randomly In this web chat...There's spam. Once you join, you automatically start spamming and have no control!
-
Web chat with authentication People using others' names to send messages? This web chat implements cookie-based authentication and allows you to use only your ID to sign in
Cool Web Chats made by Hack clubbers
Did you make something awesome? Share it on #ship in the Hack Club Slack and tag me with @KhushrajRathod!